How to add boot and install drivers to a repository Windows ISO
To add drivers to existing iso:
Download iso used from your repository make directory structure like this: c:\images\drivers c:\images\ISO c:\images\mount
Download boot drivers from the provider, extract them and add them in a folder under c:\images\drivers (you can add multiple drivers from multiple manufacturers as we will use the recurse option) Mount the iso in Windows, and copy contents to c:\images\ISO
Install this: Download and install the Windows ADK
CD to the Assesment and Deployment Kit:
cd c:\Program Files (x86)\Windows Kits\10\Assessment and Deployment Kit\Deployment Tools\amd64\Oscdimg
Open Powershell and run:
1/ To find the version of Windows you need to add drivers to (if you want to add for multiple versions, you will have to run the below for all of them (i.e. 2 is normally Windows Server Standard with GUI))
Get-WindowsImage -ImagePath C:\Images\ISO\sources\install.wim
2/ Mount the specific install.wim from step 1
Mount-WindowsImage -Path C:\Images\Mount -ImagePath C:\Images\ISO\sources\install.wim -Index 2
3/ Add the drivers to the Windows Install.wim
Add-WindowsDriver -Path C:\Images\Mount -Driver C:\Images\Drivers -Recurse
4/ Dismount the installer image
Dismount-WindowsImage -Path C:\Images\Mount -Save
5/ Next we need to mount the boot.wim (same number as step 1)
Mount-WindowsImage -Path C:\Images\Mount -ImagePath C:\Images\ISO\sources\boot.wim -Index 2
6/ Add the drivers to the Windows boot.wim to allow the boot process to see the drivers (for controllers and network cards etc)
Add-WindowsDriver -Path C:\Images\Mount -Driver C:\Images\Drivers -Recurse
7/ Dismount the boot image
Dismount-WindowsImage -Path C:\Images\Mount -Save
Create the ISO as UDF with a label of SSS_X64FREV_EN-US_DV9_Perc2019 as an example
oscdimg -h -m -o -u2 -udfver102 -bootdata:2#p0,e,bc:\Images\ISO\boot\etfsboot.com#pEF,e,bc:\Images\ISO\efi\microsoft\boot\efisys.bin -lSSS_X64FREV_EN-US_DV9_Perc2019 C:\Images\ISO C:\WS2019Std_Perc2019-5.iso
Upload iso to your repository
Enter the template, click on Assets

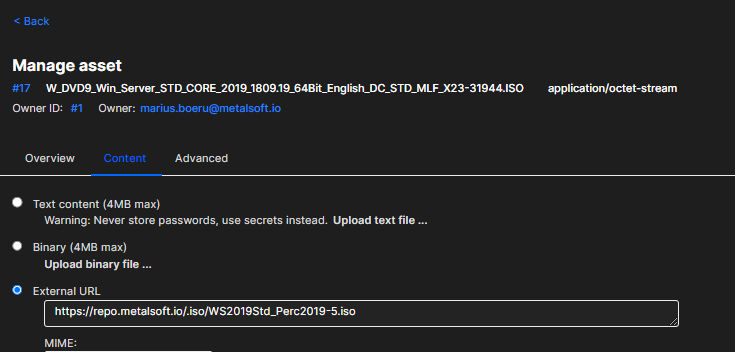
Click on edit next to the iso asset and click on the pen icon to change the display name of the ISO and save:

Then click on Content and change the External URL to the file name: of the new ISO:
