Post upgrade testing
Once an environment has been upgraded to the latest version of the software, it is important to ensure testing is completed in line with your internal policies.
Below is a minimum post upgrade test process which can be undertaken to check the most common features of the software.
User Management
Create new user
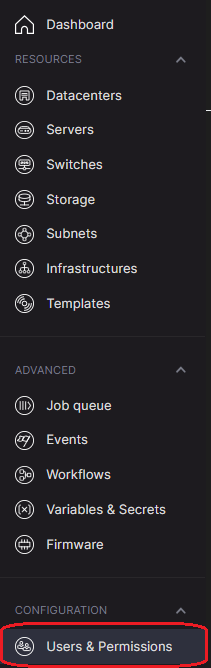
Create new user with user role and ensure when logging in, user is directed to Infrastructure Editor In the Admin UI, click on “Users and Permissions” under “Configuration”
Click on “Add User” on the right

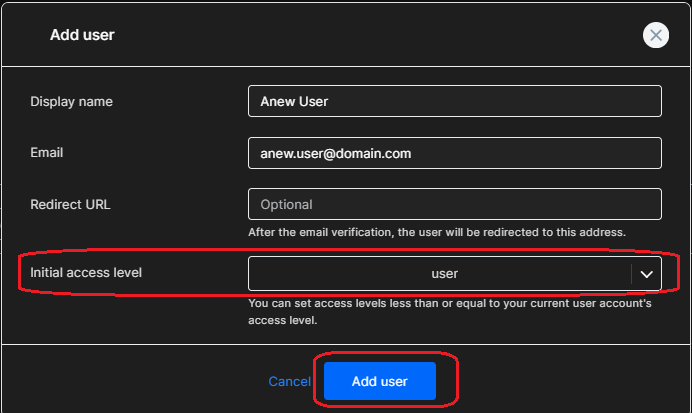
Fill in the details, change the Initial Access Level to “User” and click on “Add User”
Confirm the user has received a verification mail and they can log in and are redirected to the Infrastructure Editor
Create new user with admin role and ensure when logging in, user is directed to Admin UI
In the Admin UI, click on “Users and Permissions” under “Configuration”
Click on “Add User” on the right
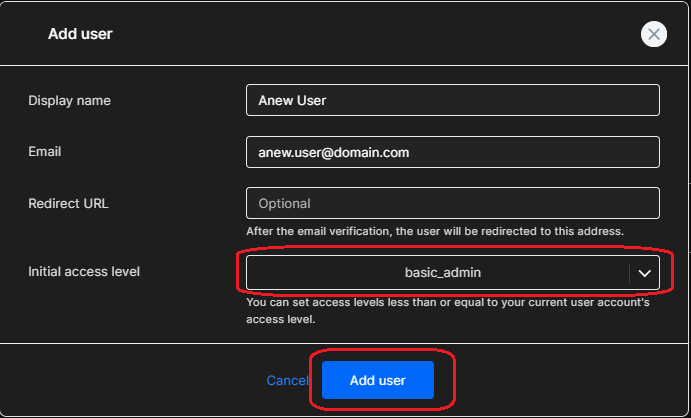
Fill in the details, change the Initial Access Level to “Basic Admin” and click on “Add User”
Confirm the user has received a verification mail and they can log in and are redirected to the Infrastructure Editor
Send password recovery e-mail
In the Admin UI, click on “Users and Permissions” under “Configuration”
Click on the user and click on “Advanced”, then click on “Send password recovery email”
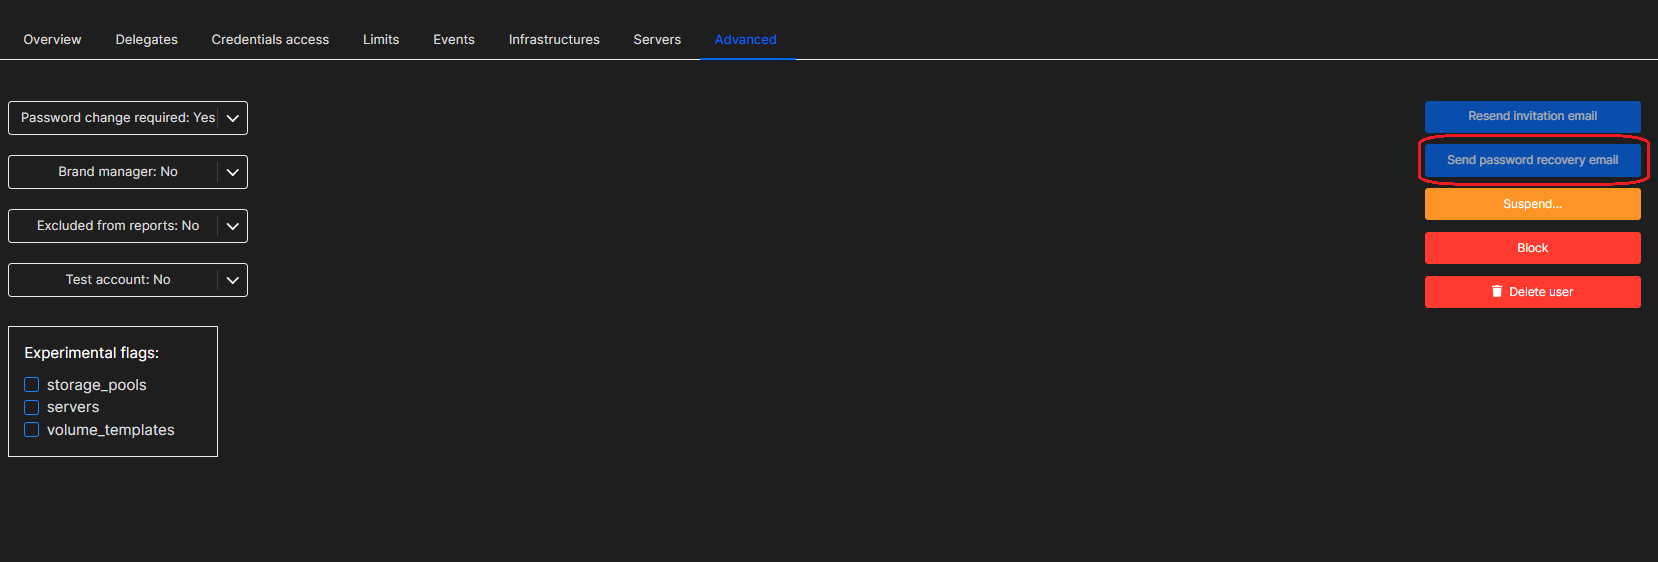
Ensure the user has received the e-mail and can reset their password.
Resend invitation e-mail
Create a user but ensure the user does not click on the link in the e-mail they receive. In the Admin UI, click on “Users and Permissions” under “Configuration”
Click on the user and click on “Advanced”, then click on “Resend Invitation Email”

Ensure the user has received the e-mail and can verify their account.
Block or Suspend a user
In the Admin UI, click on “Users and Permissions” under “Configuration”
Click on the user and click on “Advanced”, then click on either “Block” or Suspend”
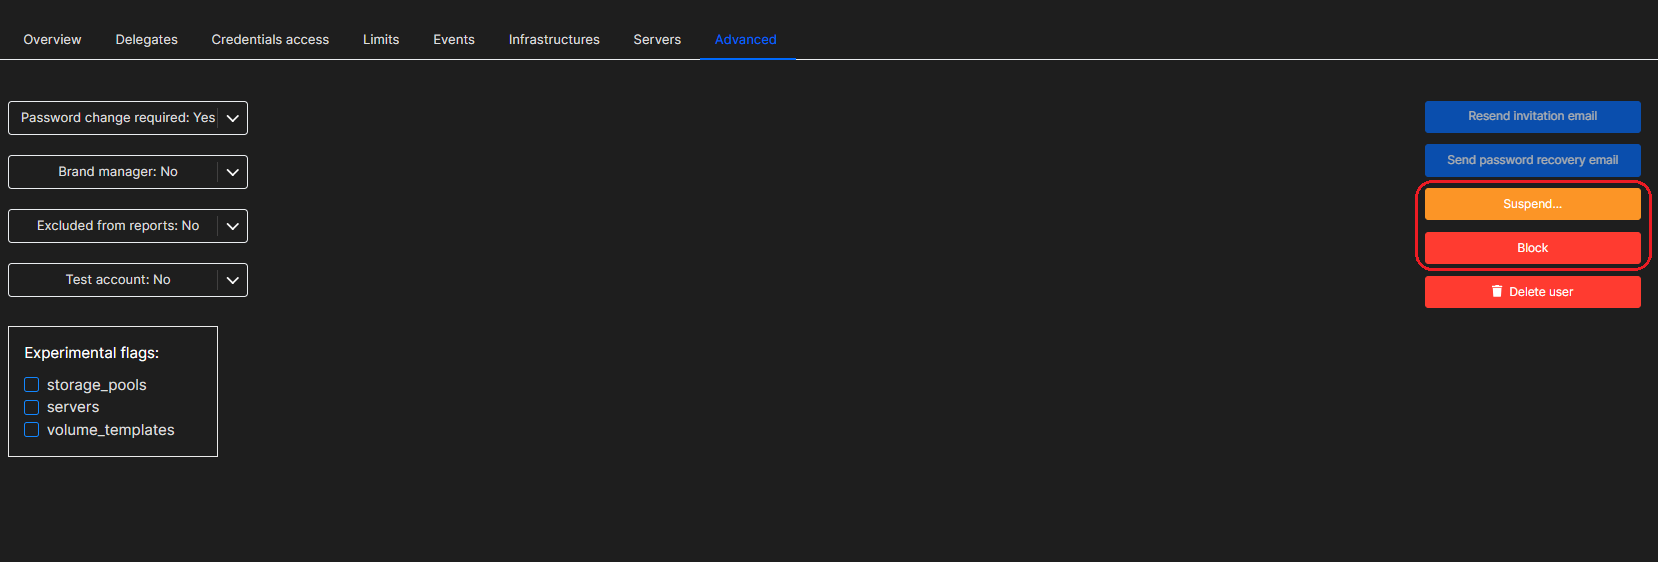
Ensure the user can no longer log in.
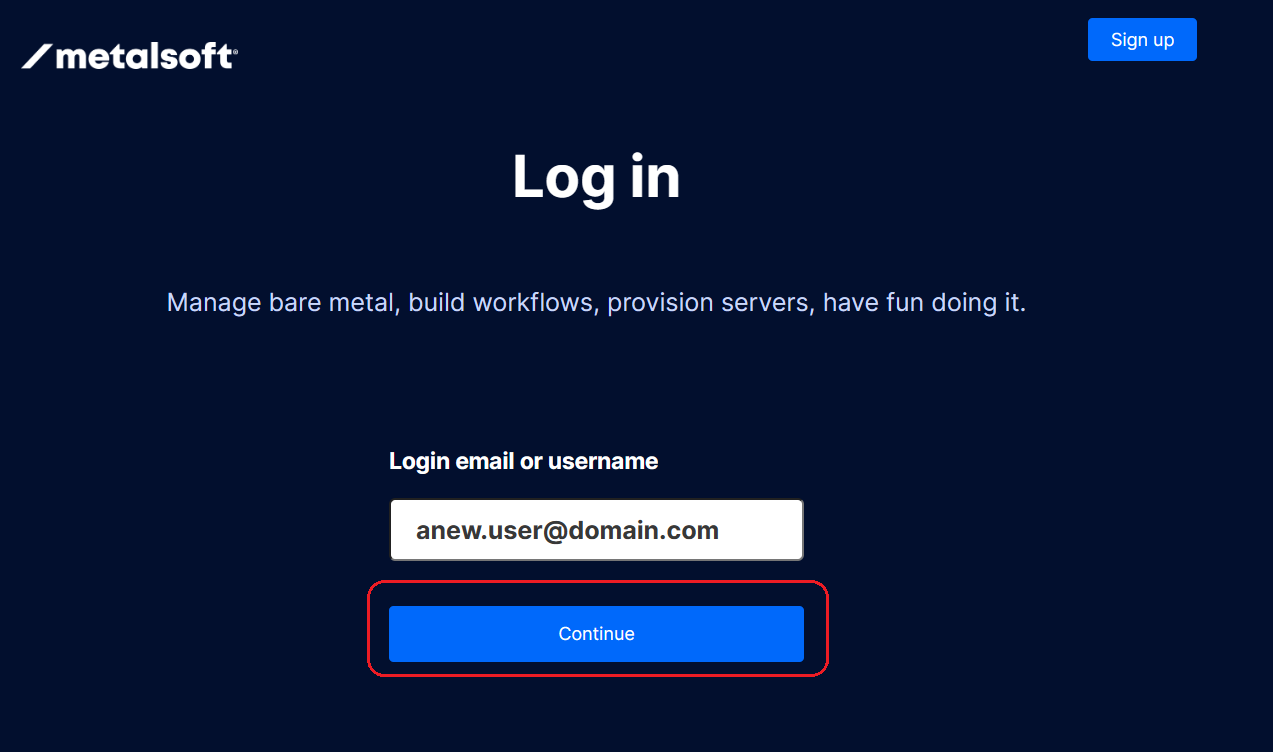
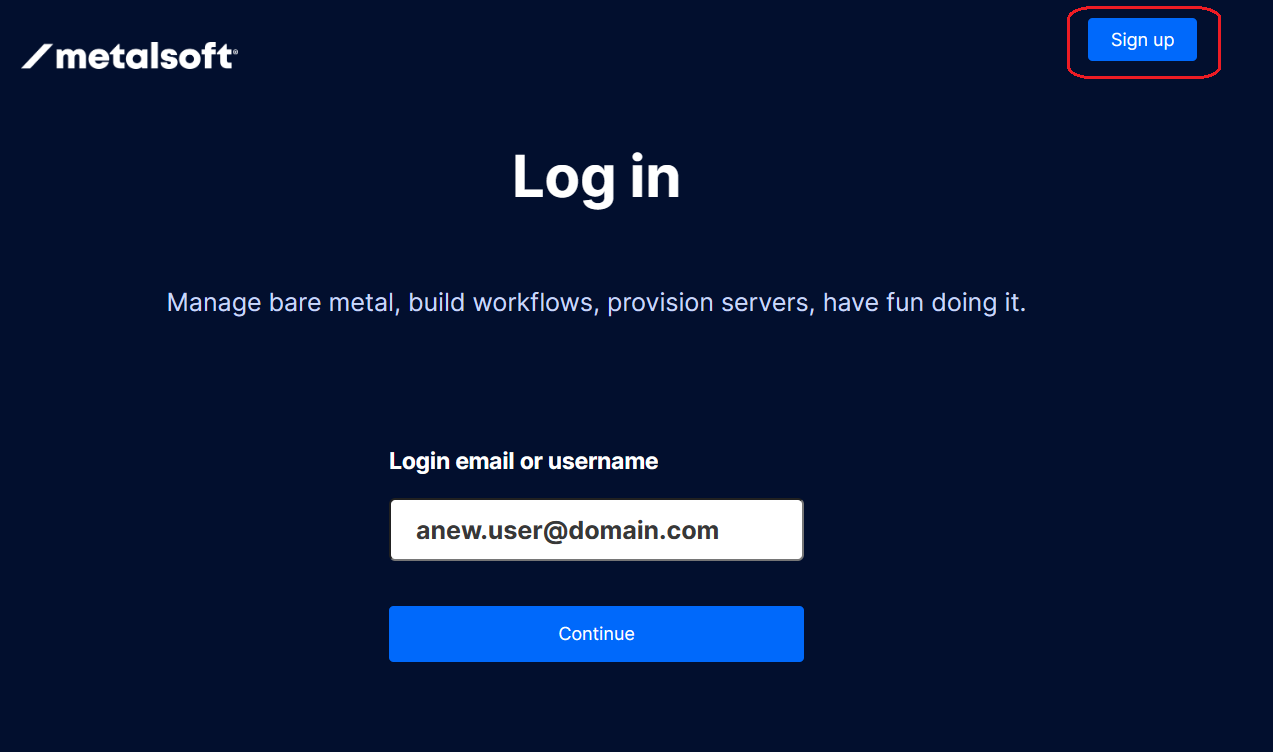
Check “forgot password” function on login page
Ensure you are logged out of the portal, launch the Web page and type in your credentials and click on “Continue”
Click on “Forgot Password” at the bottom of the page
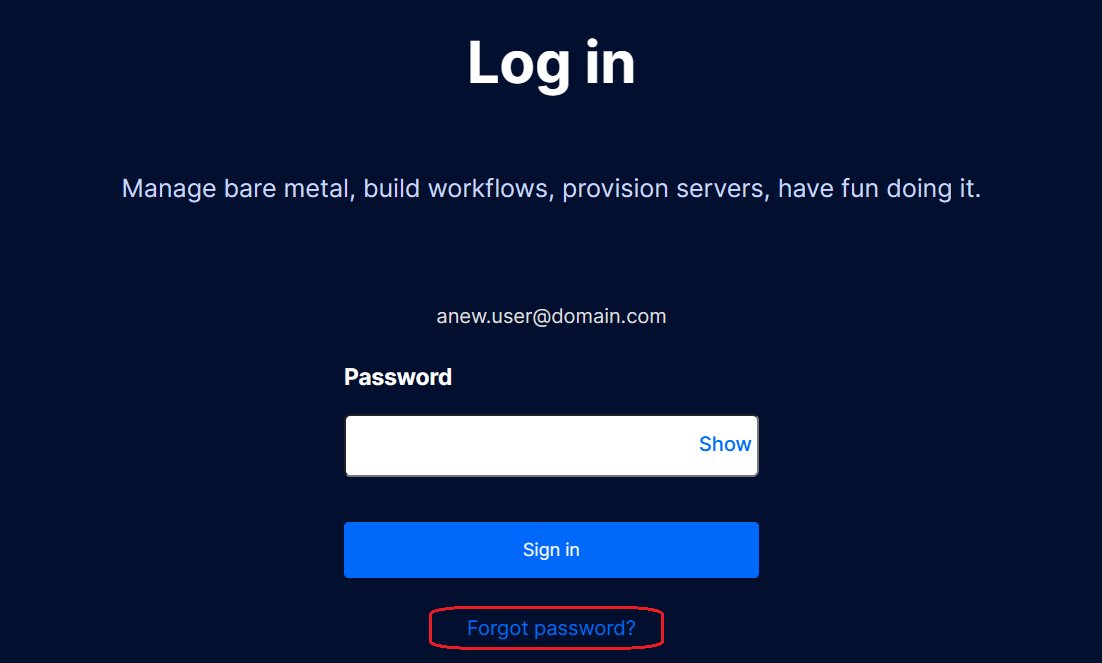
Fill in the recovery e-mail address and click on “Send recovery email”
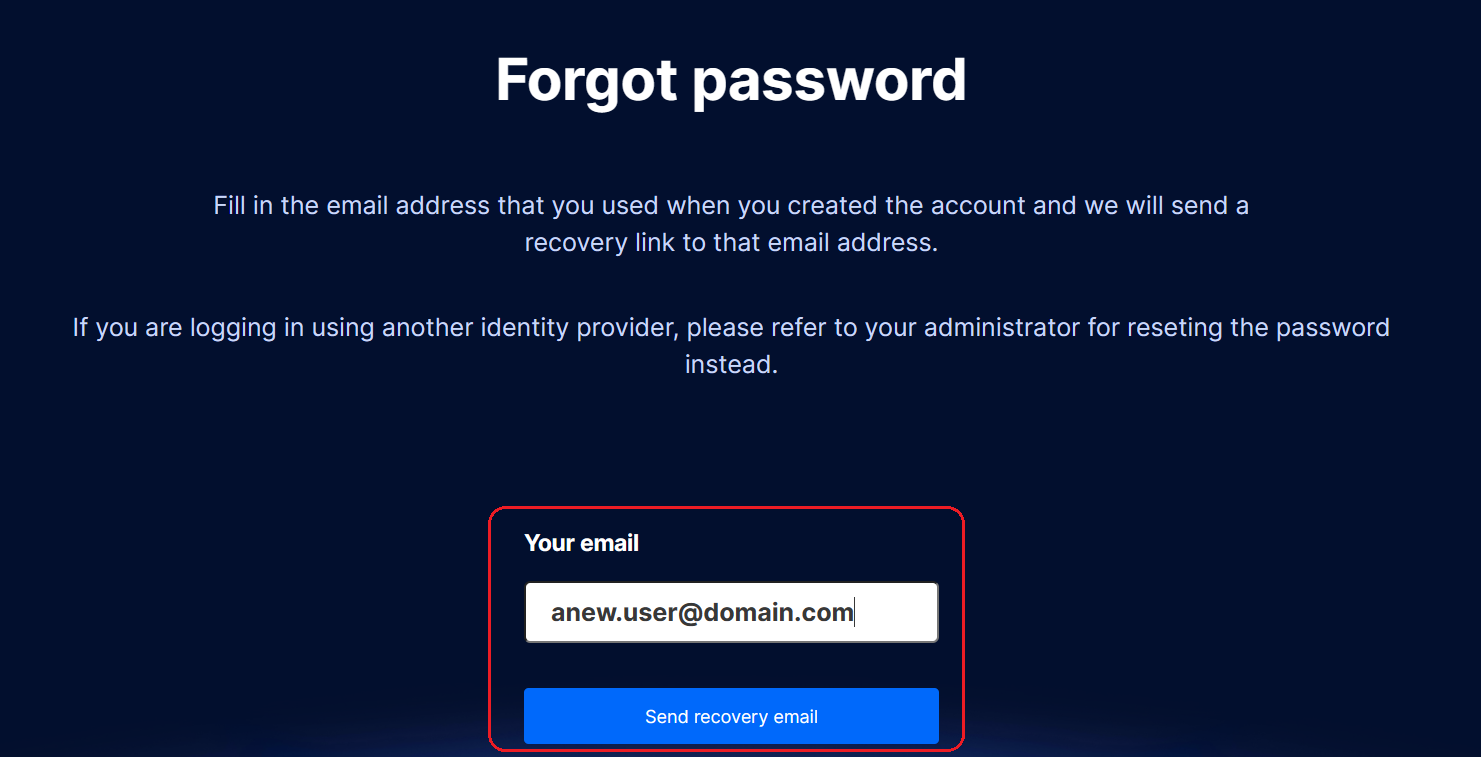
Check the user receives the recovery e-mail and can change the password
If enabled, Check Sign up
Ensure you are logged out of the portal, launch the Web page and click on “Sign Up” in the top right of the page
Fill in the e-mail address and password (the domain must be allowed in Global Configurations\Authentication\ Built-in users allowed domains) and click on “Sign Up”
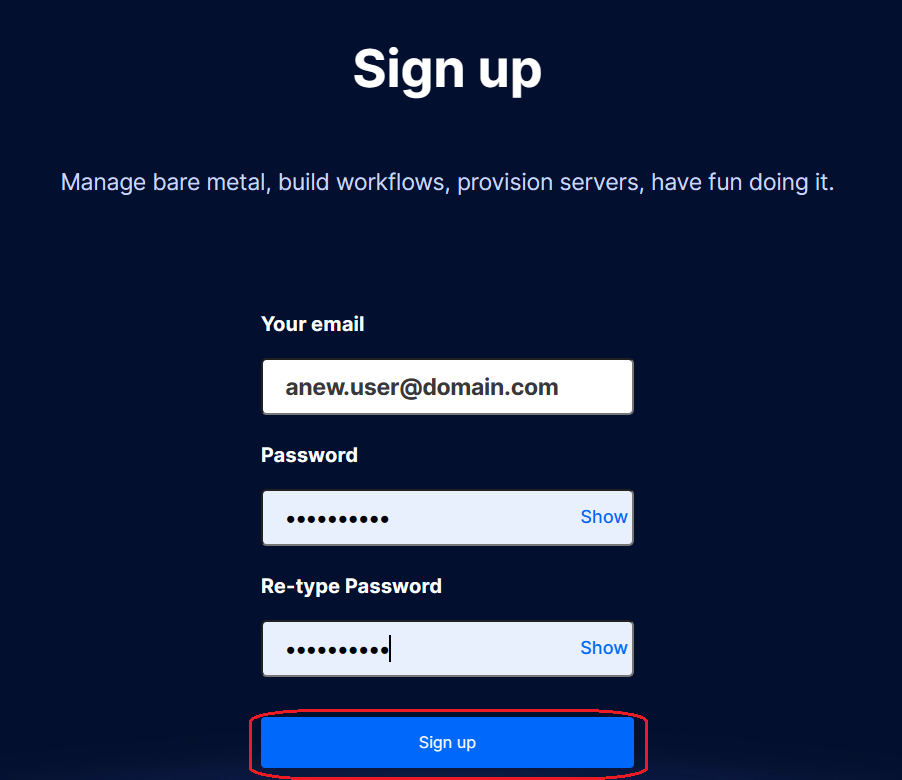
Check the user receives the sign e-mail and can log in
Server Management
Test server can be powered on and off in the Admin UI
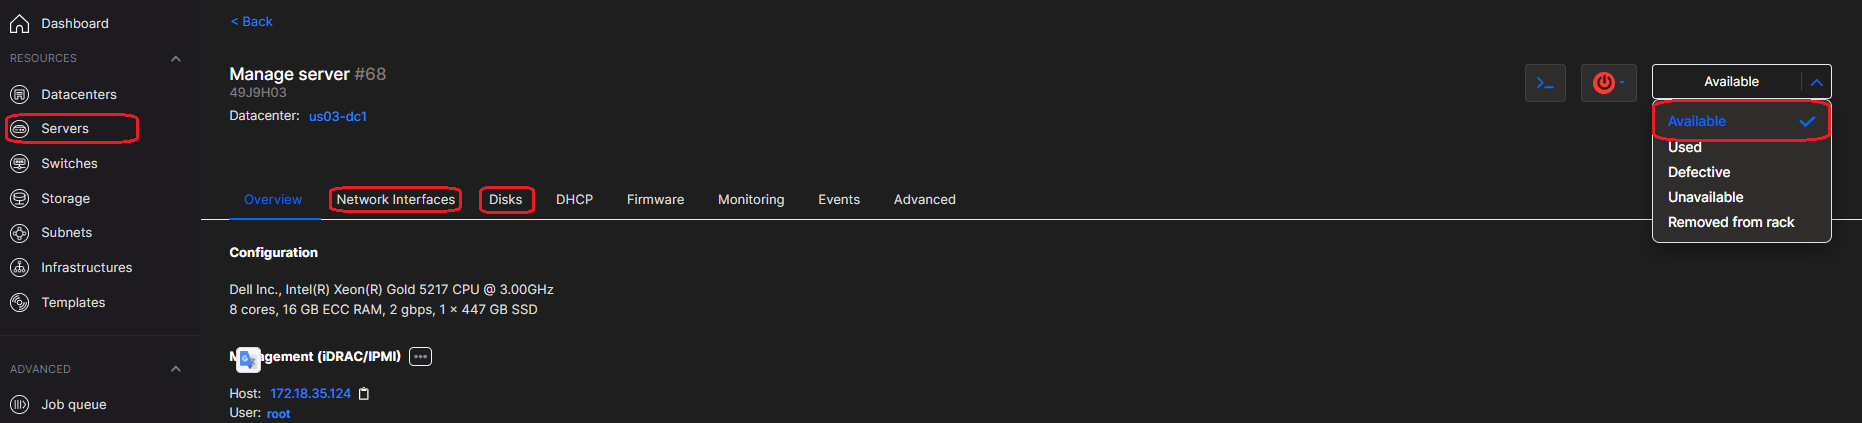
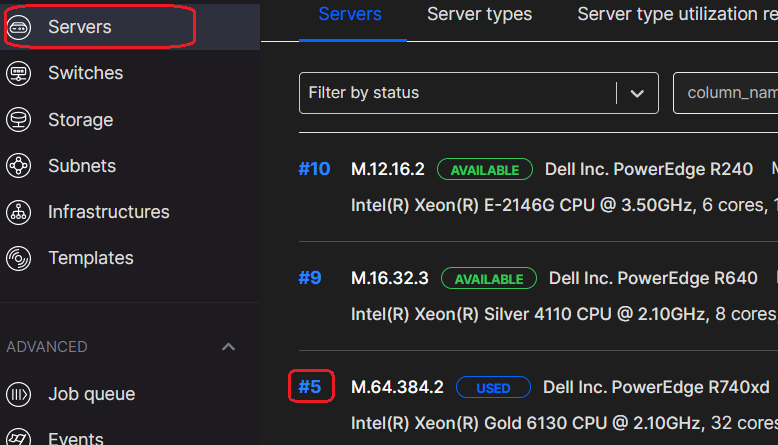
In the Admin UI, click on Servers and click on an Available server
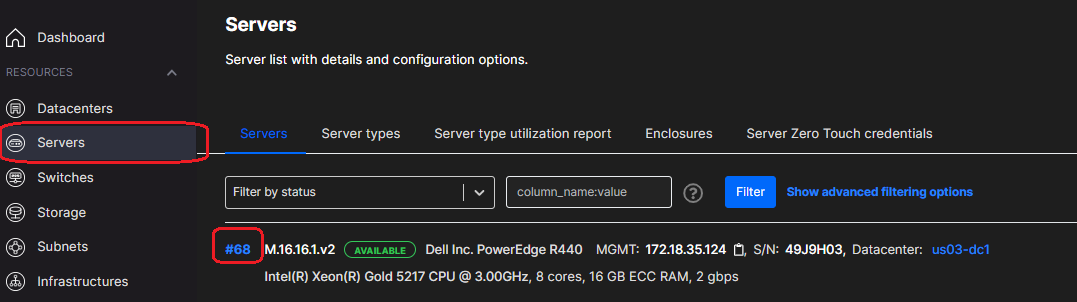
On the right, check the power is off (the power button should show as red if off and green if on)

Press on the power button and select “Power on”

Get the details from the server page
Log into the BMC and ensure the server is powering on. Once confirmed, test the power off by selecting “Power Off - Hard” and checking the BMC to ensure the server has powered off

Re-register available server
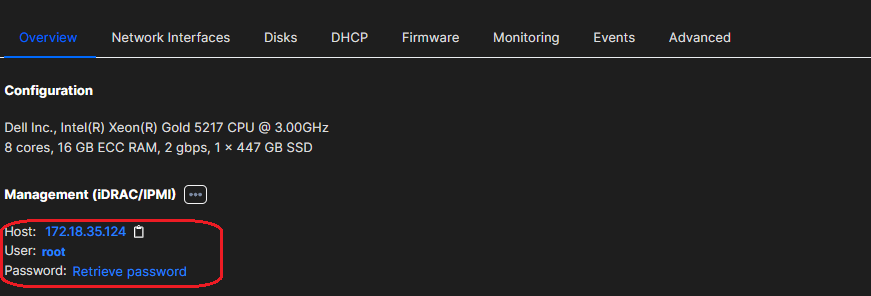
In the Admin UI, click on Servers and click on an Available server
Take a copy of the BMC IP address/User and password from the Overview page to ensure you have them in case of any issue
Change the server to Unavailable
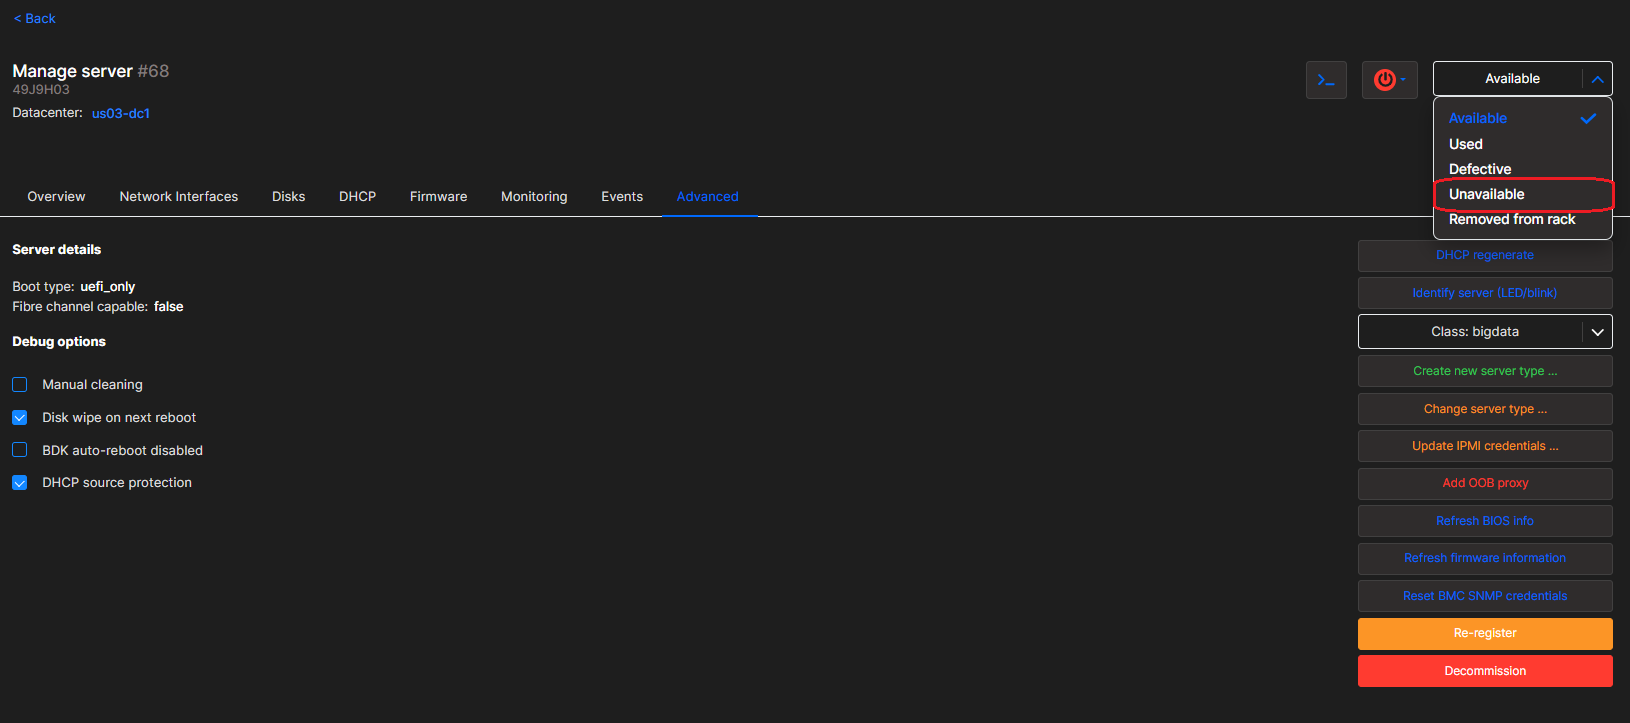
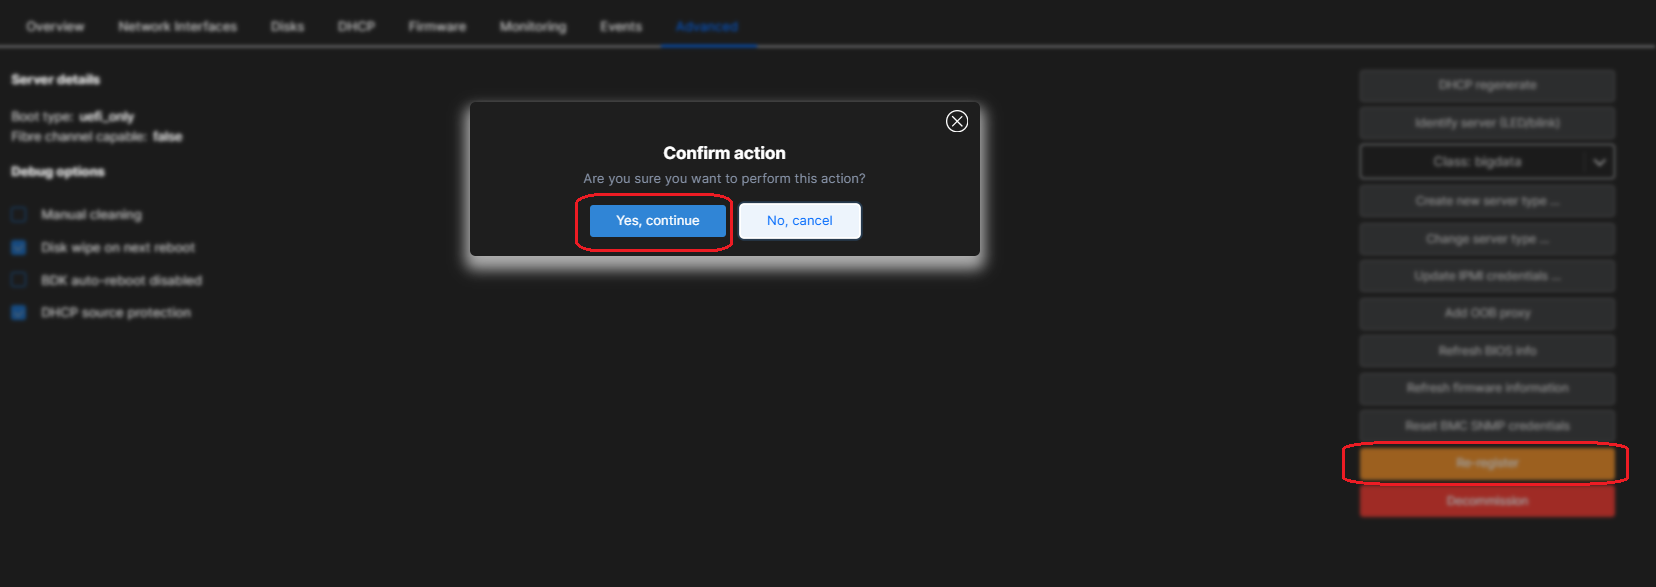
Click on Advanced and click on “Re-Register Server and hit Yes on the pop up
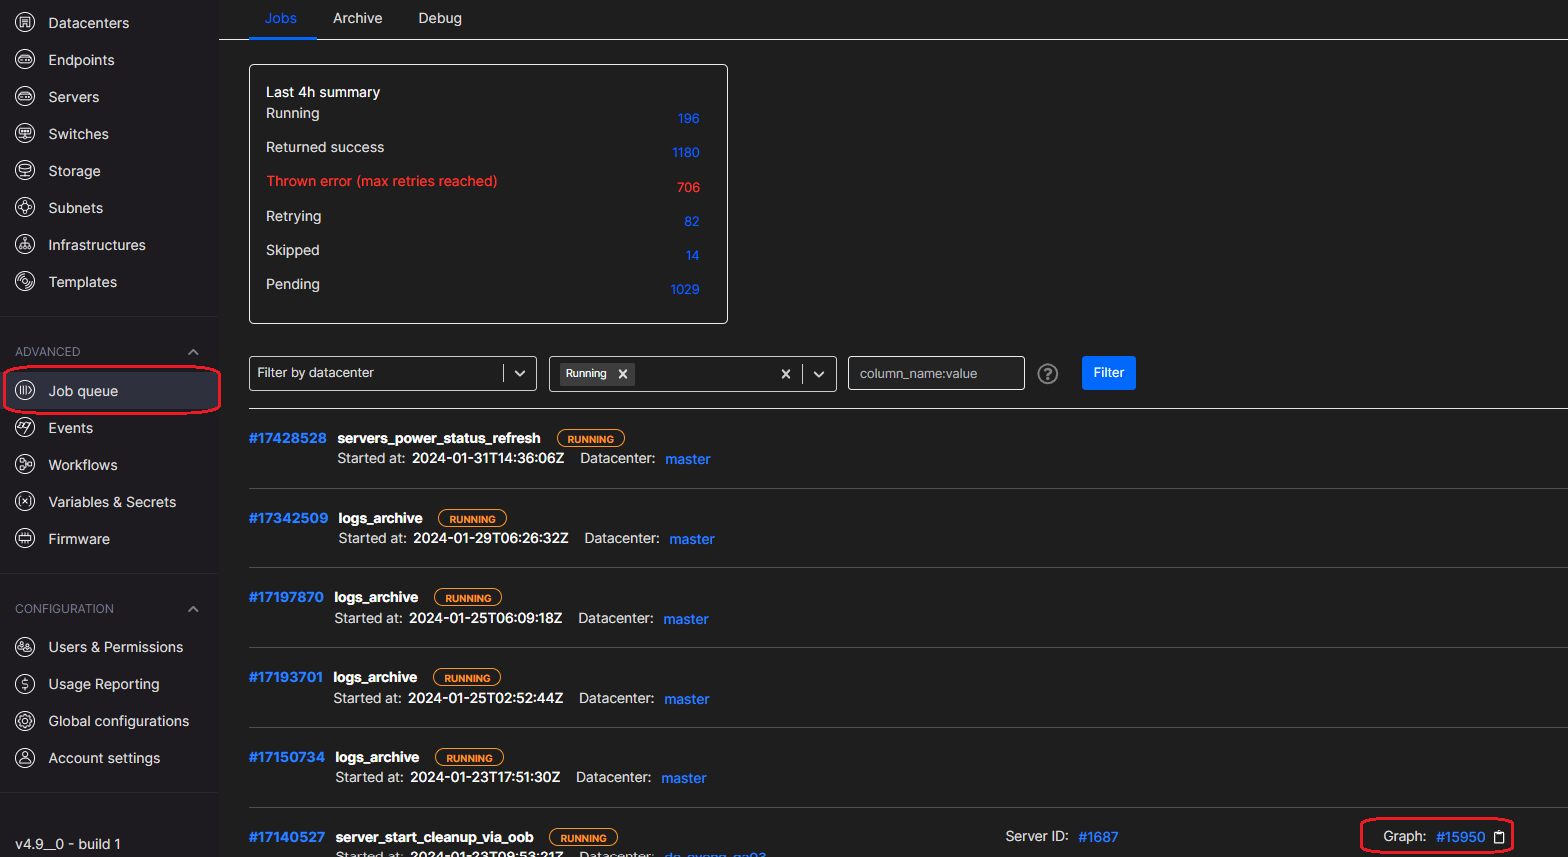
Once the server is re-registering, you can click on Job Queue on the left, find the server ID in the jobs and click on the graph ID to watch the progress
When the server has completed re-registering you will see it in the Unavailable state and you can change it back to available as above on the servers page/server/advanced
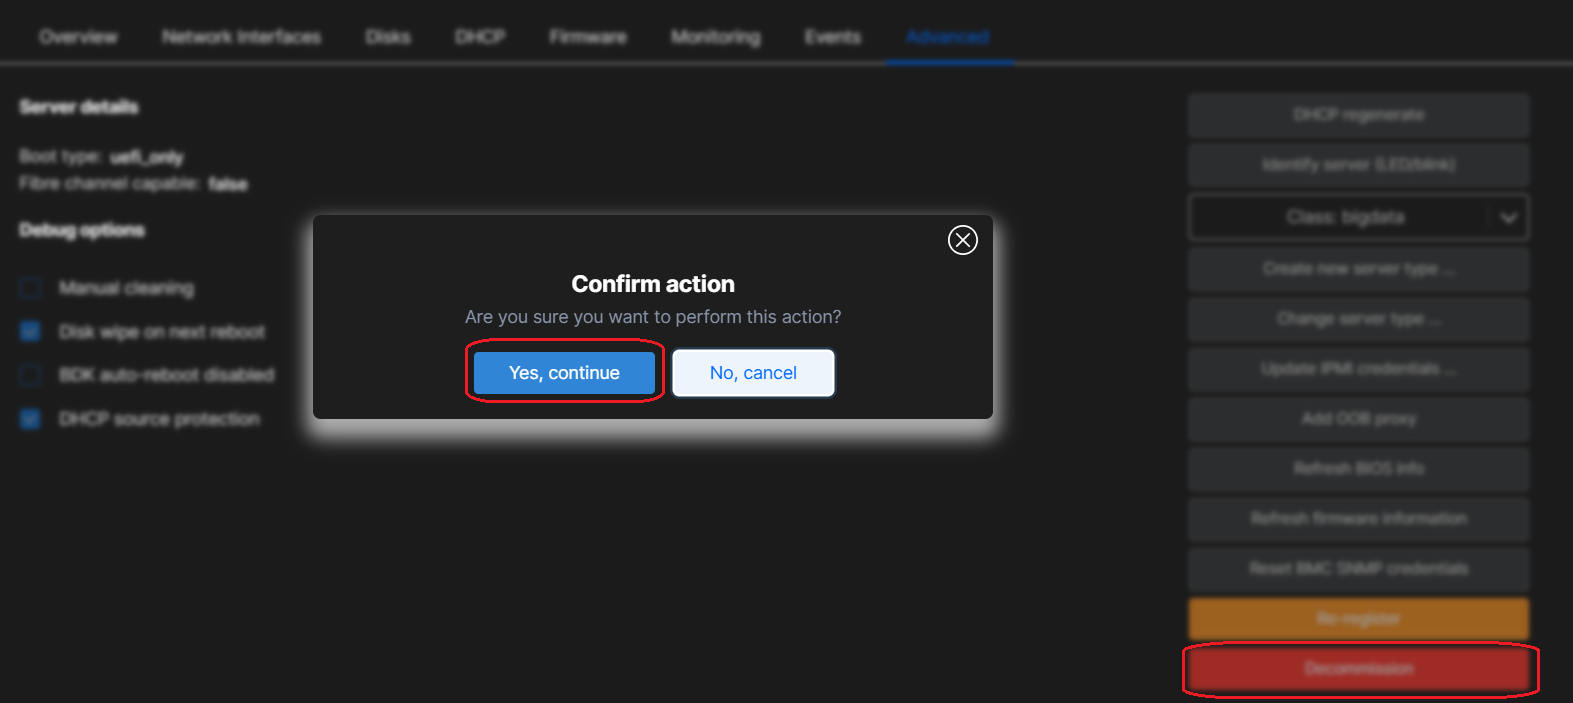
Delete and register available server
In the Admin UI, click on Servers and click on an Available server
Take a copy of the BMC IP address/User and password from the Overview page
Change the server to Unavailable
Click on Advanced and click on “Decommission and hit Yes on the pop up
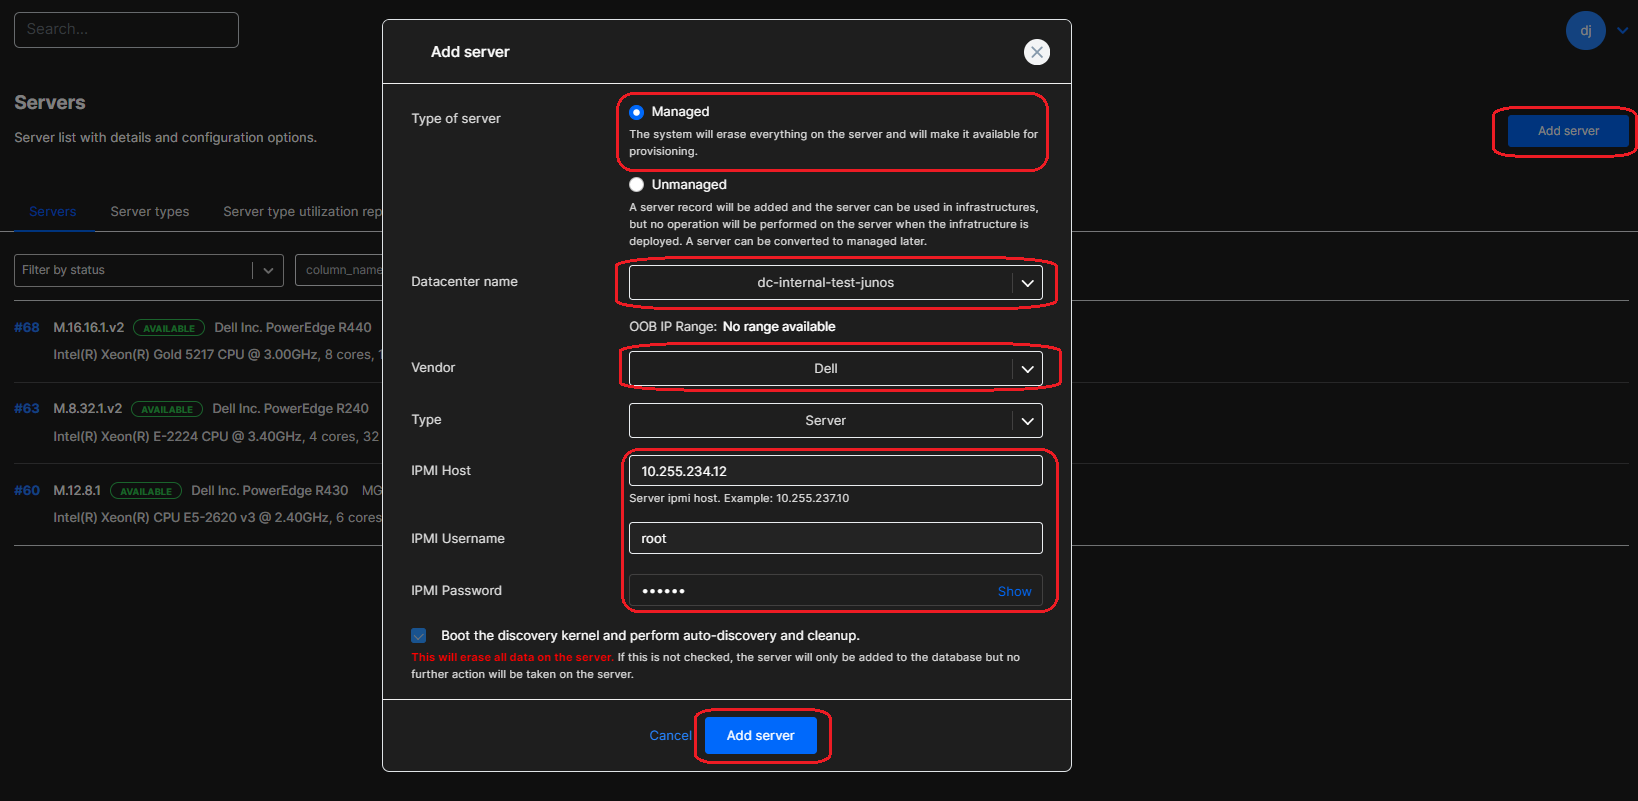
Once the server is decommissioned, click on Servers/Add server, then fill in the form (Select Managed and the datacenter name and server model and fill out the IPMI IP address/user and password and click on “Add Server”
Once the server is registering, you will find a job in the Job Queue on the left and you will find the server id with a graph next to it which you can click on the graph number to check the status of the registration in the AFC graph
Once the server is re-registered, go back to the servers page, check if the server is identified correctly, check if the network connections have been identified correctly and check the disks have been identified correctly and then change the server from “Unavailable” to “Available”
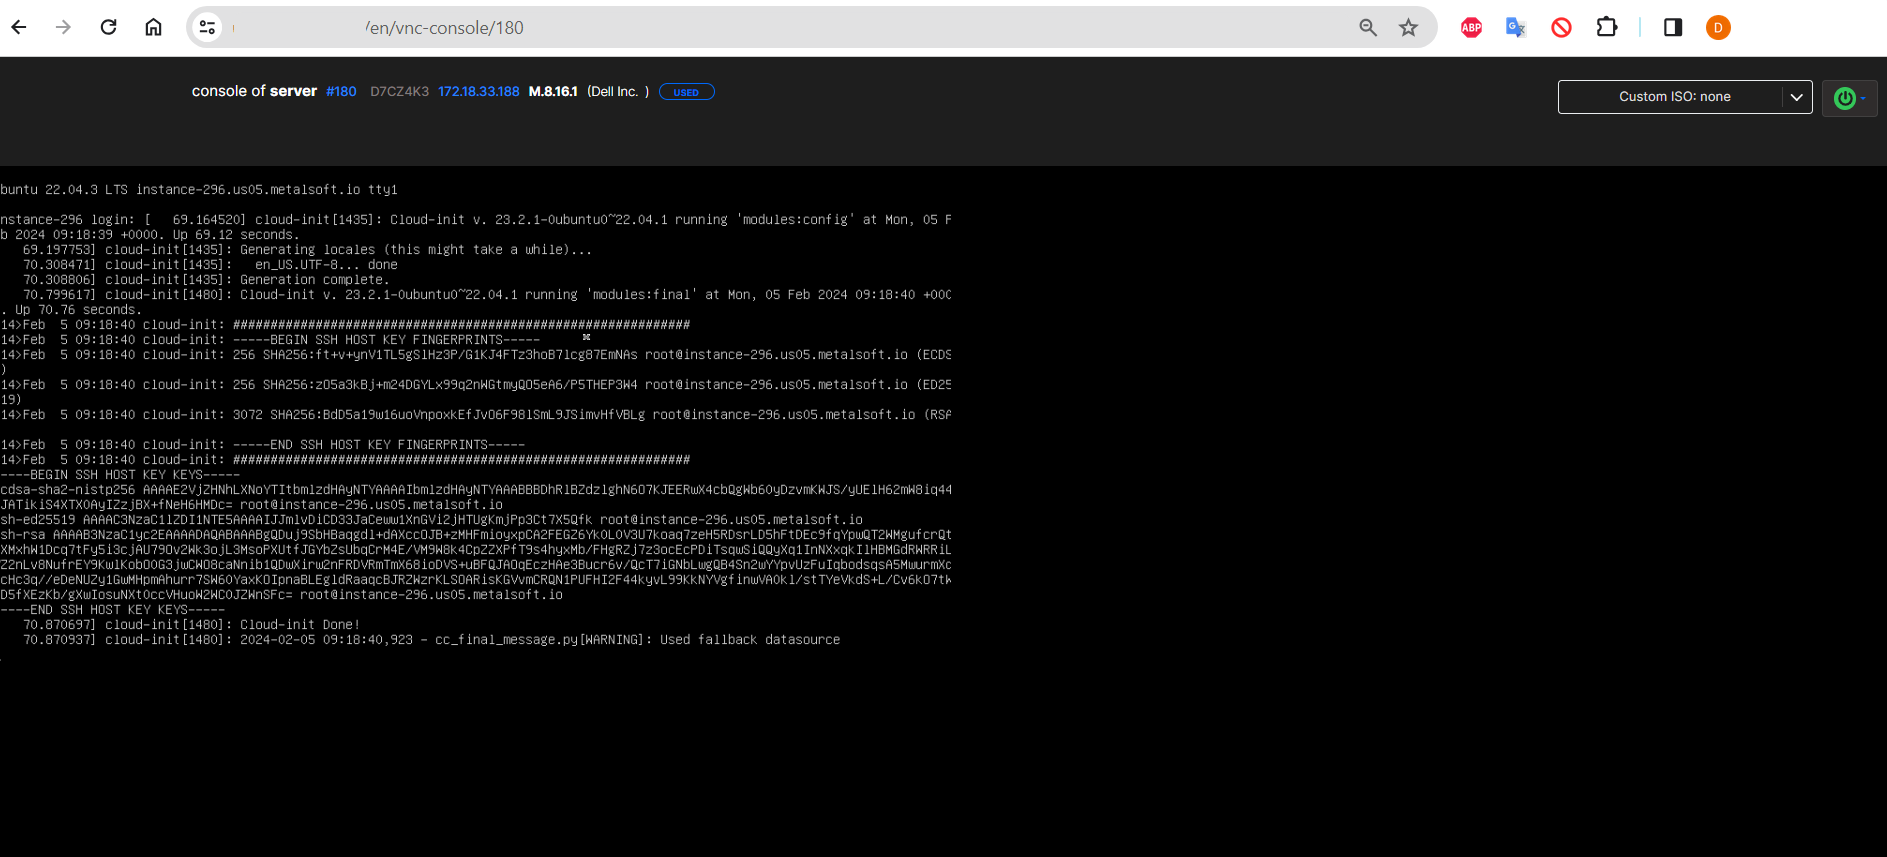
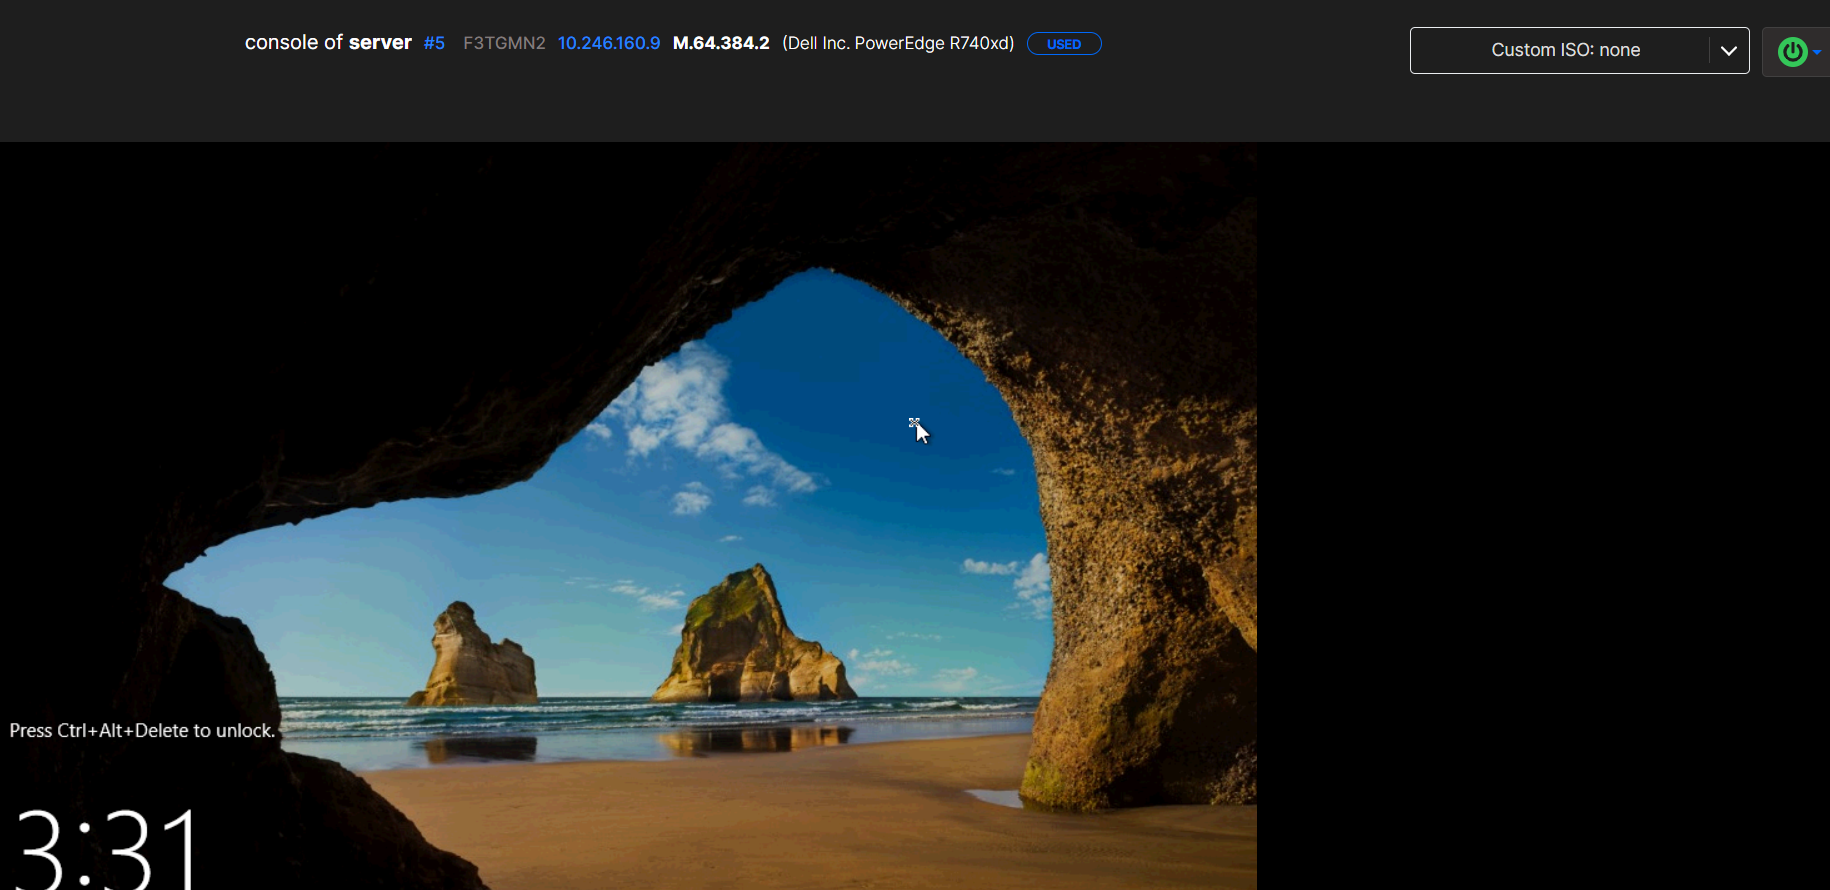
Check VNC console works from Admin UI for a used server
In the Admin UI, click on Servers and click on a Used server
Click on the console button

This will launch the VNC console into a new tab
Check Custom ISO boot works (combined Server Management/Infrastructure Editor)
Please follow the instructions in the following link
Infrastructure Editor
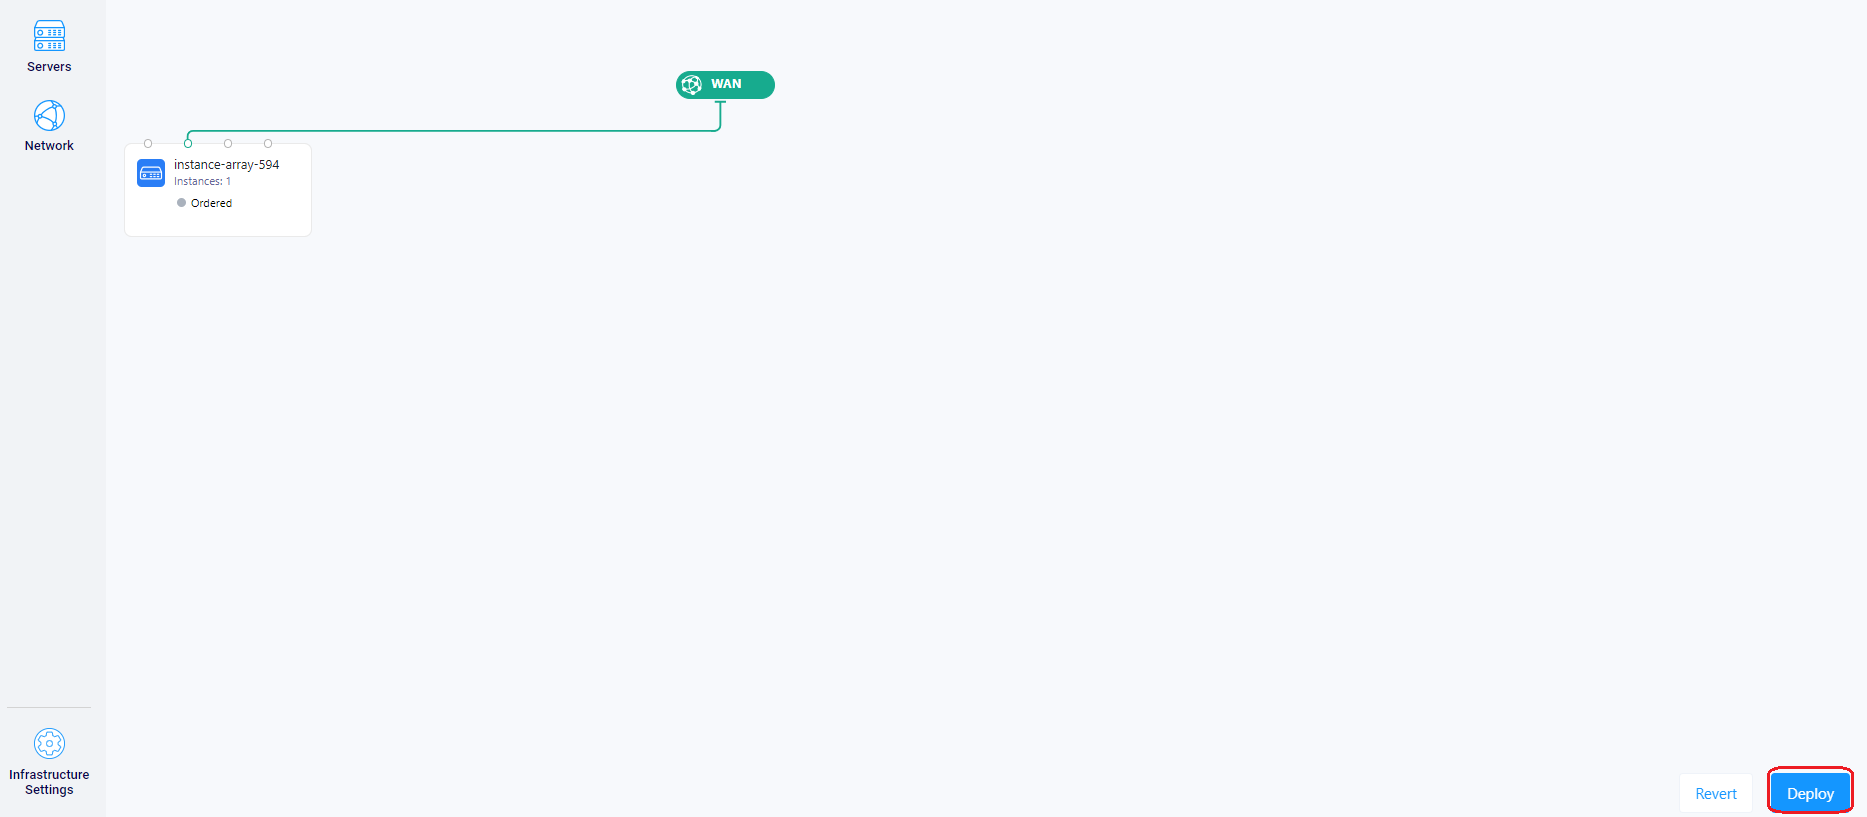
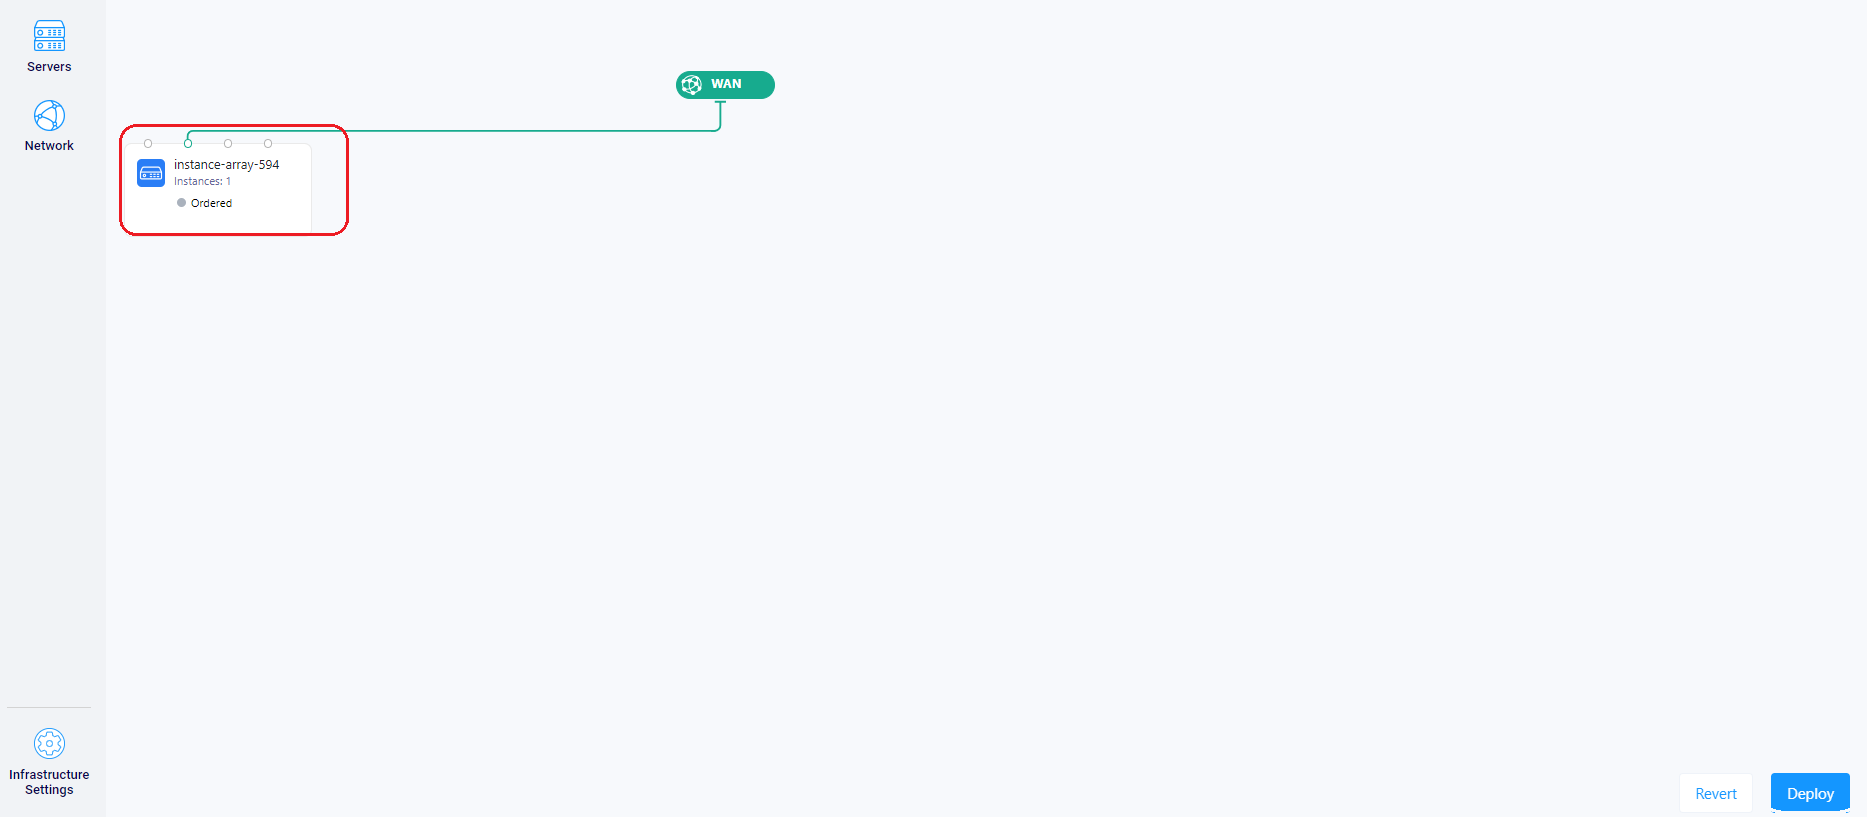
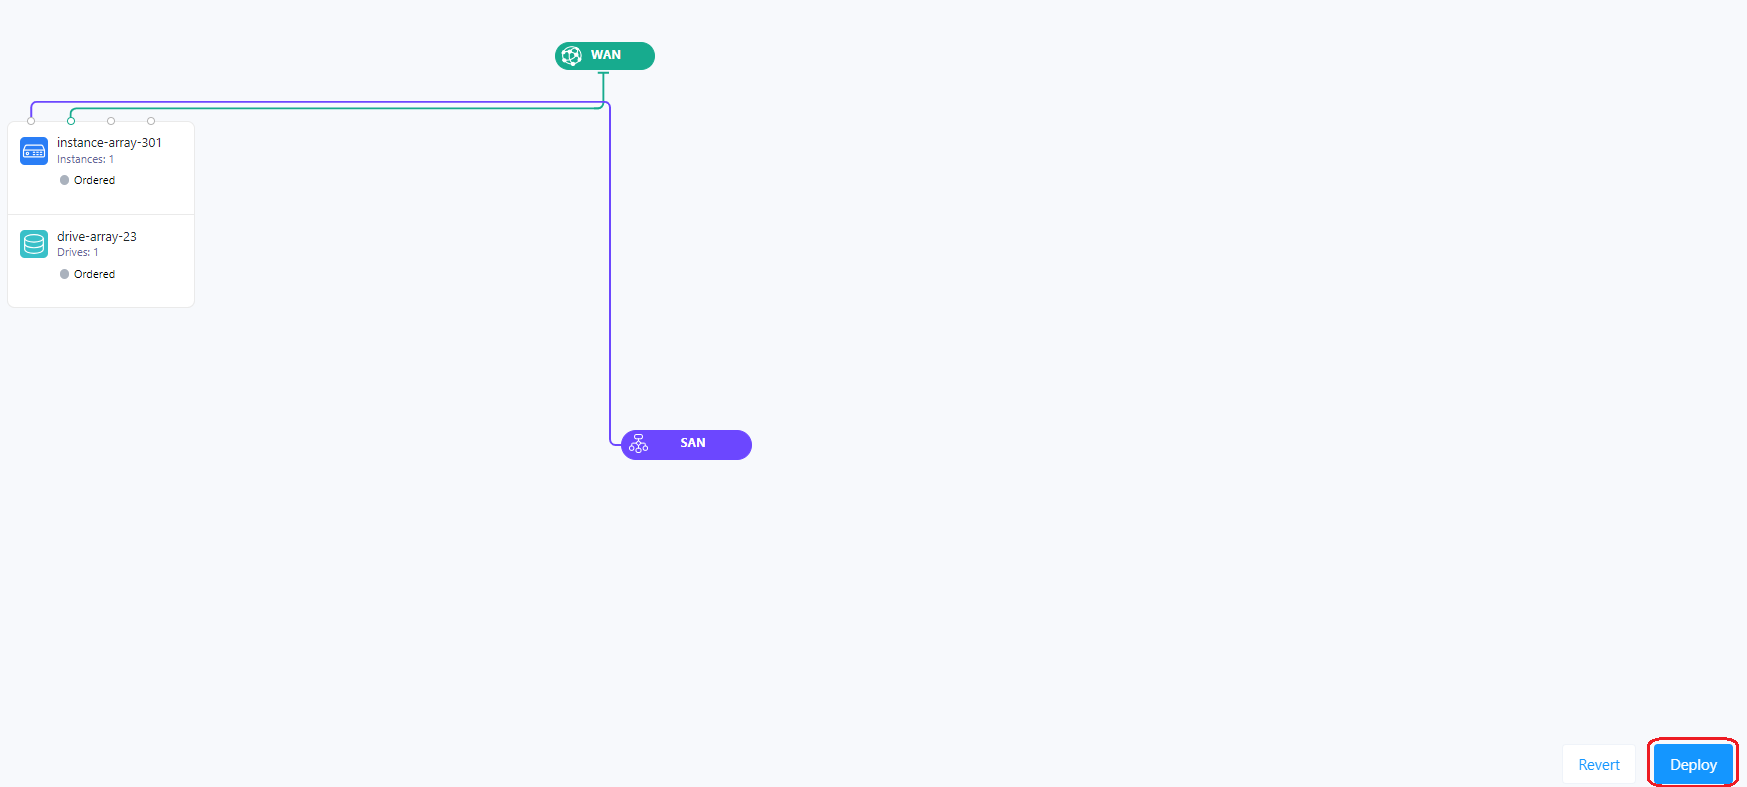
Test deployment of instance array
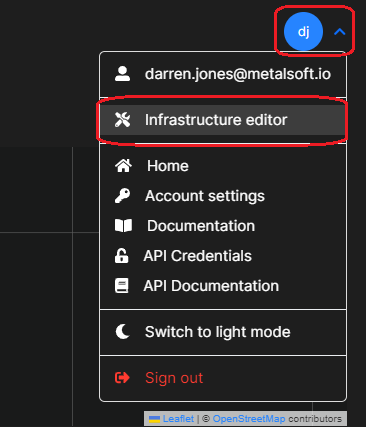
In the Admin UI, click on your initials at the top right and select “Infrastructure Editor”
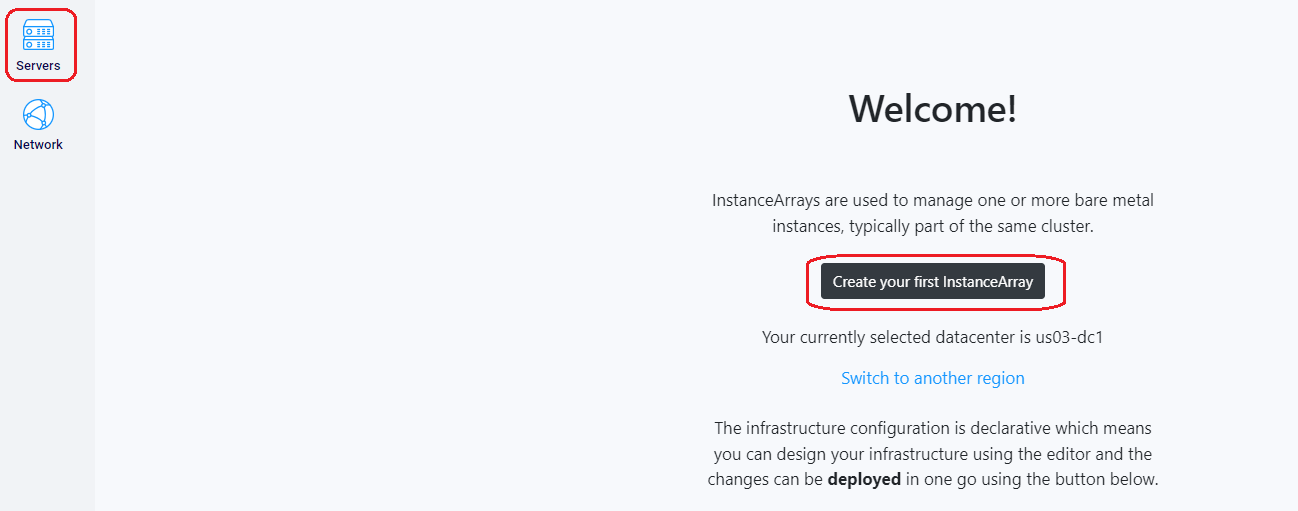
Click on either “Servers” or “Create your first Instance Array”
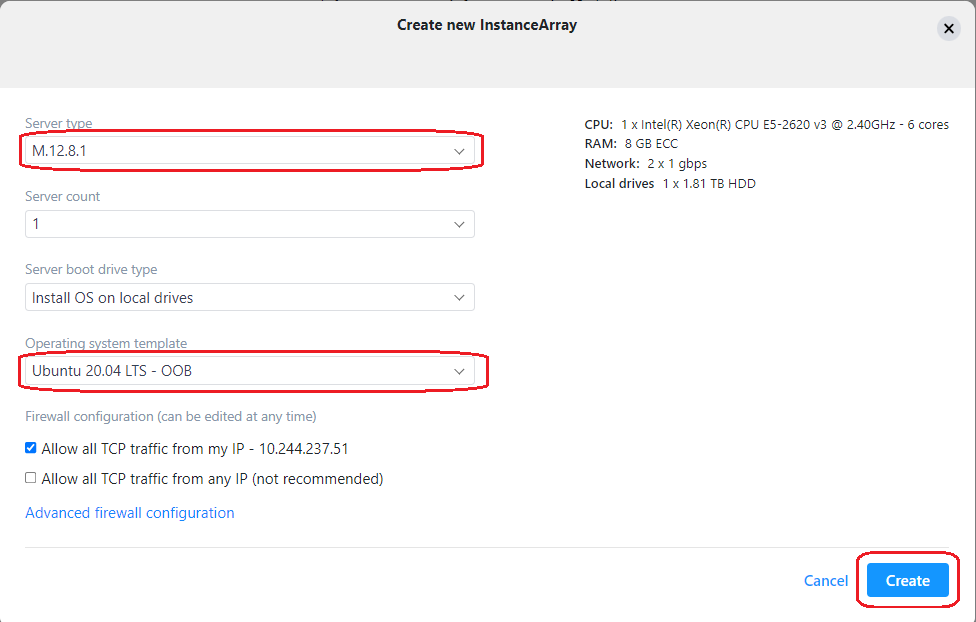
In the Create New InstanceArray window, select the server type and a template to use and click on “Create”
Click “Deploy” down the bottom right corner
In the Infrastructure Deploy window, click “Deploy”
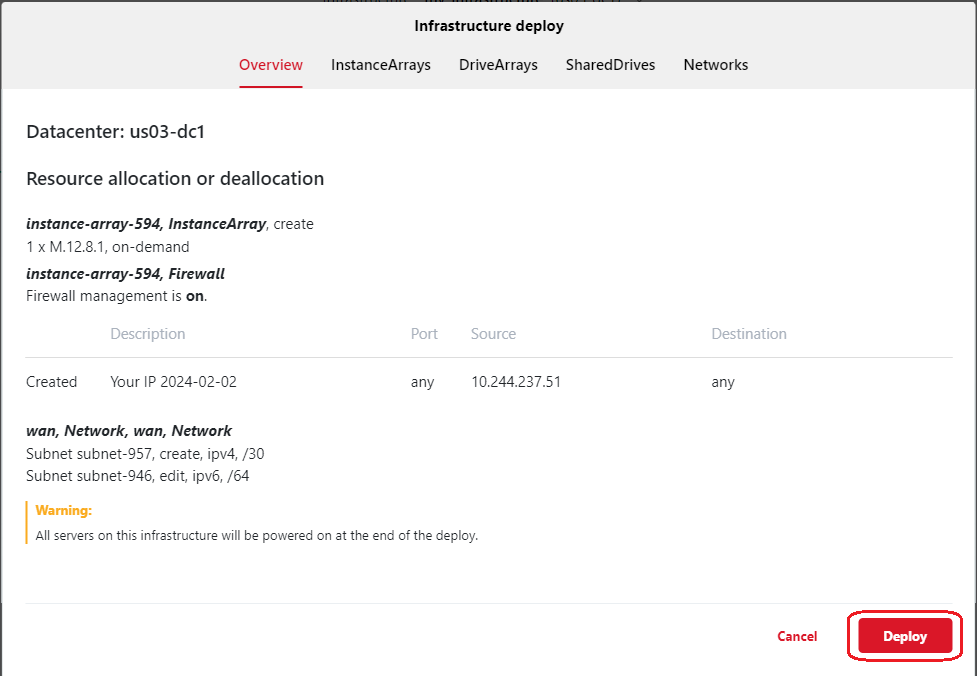
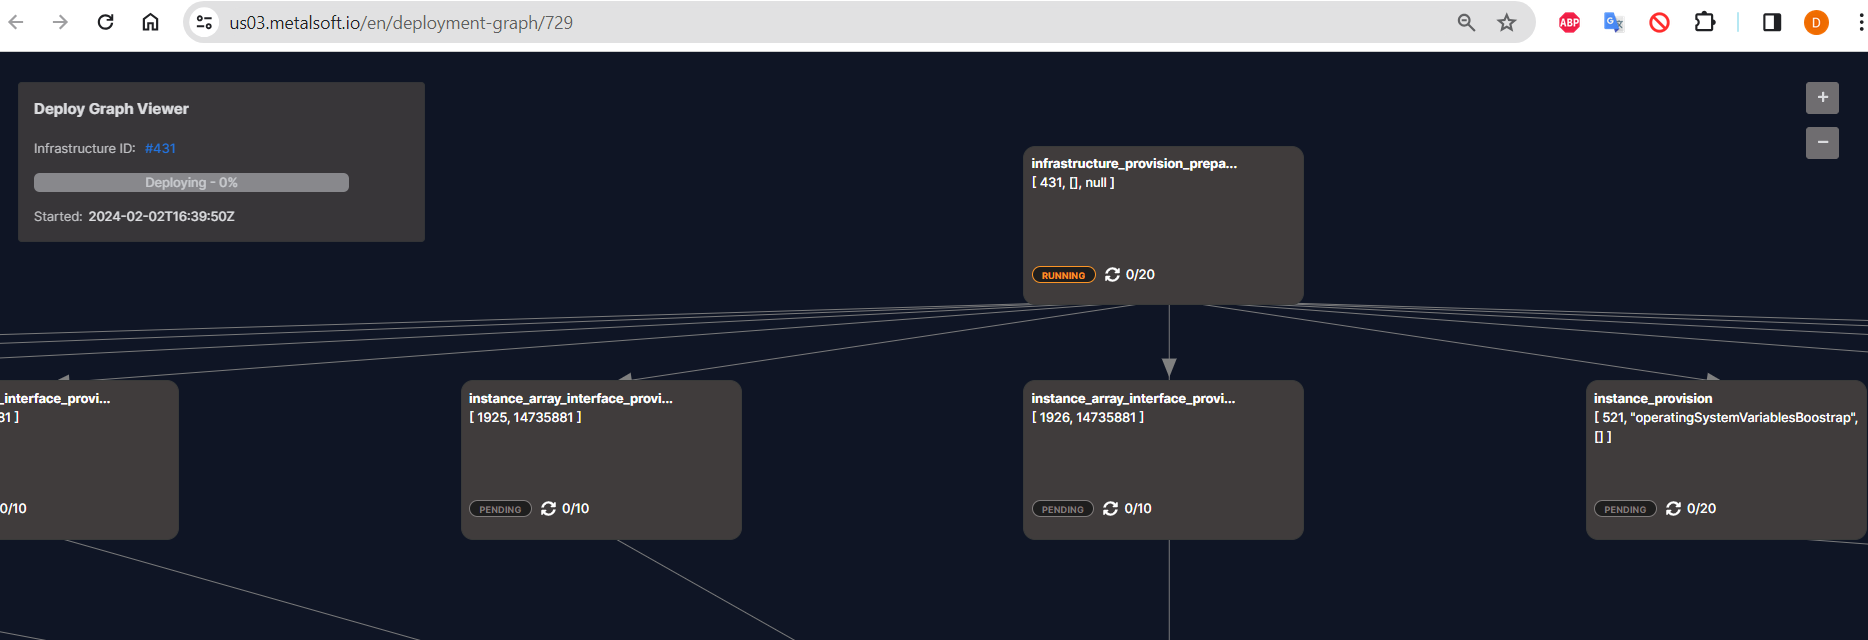
To check the status of the deploy, go back to the Admin UI and click on “Job Queue” and find the Infrastructure ID in the list and click on the Graph ID next to it
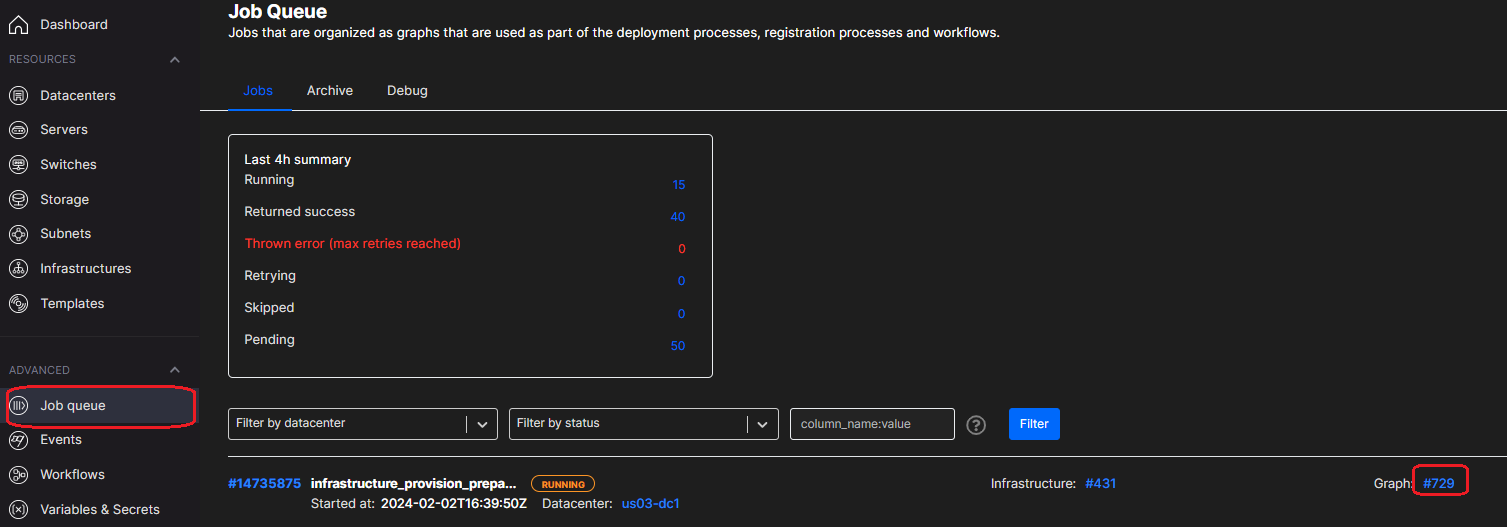
If an AFC step is running, it will be in orange and say “Running”, if it has passed, it will be green and will say “Success”, if it has failed, then it will be in red and say “Failed”
Once complete, re-enter the Infrastructure Editor and click on the instance array
Then click on “Delete Instance Array” and “Save”

Click “Deploy” down the bottom right corner
In the Infrastructure Deploy window, click “Deploy”
During the deploy, go to the Admin UI and follow the above instructions to view the AFC graph in the Job queue as detailed in the “Test deployment of instance array” chapter
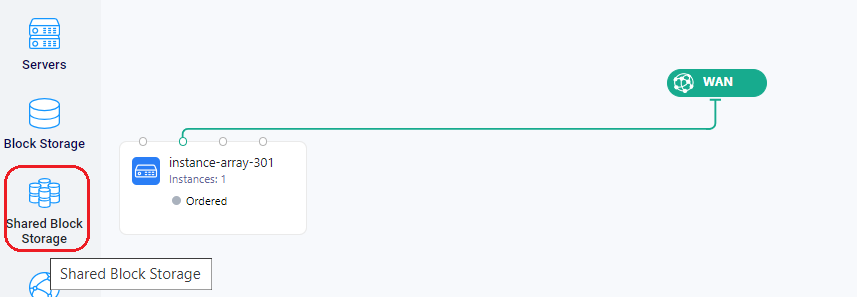
If available, test deployment of drive array
In the Admin UI, click on your initials at the top right and select “Infrastructure Editor”
Click on either “Servers” or “Create your first Instance Array”
In the Create New InstanceArray window, select the server type and a template to use and click on “Create”
Click on Block Storage on the left
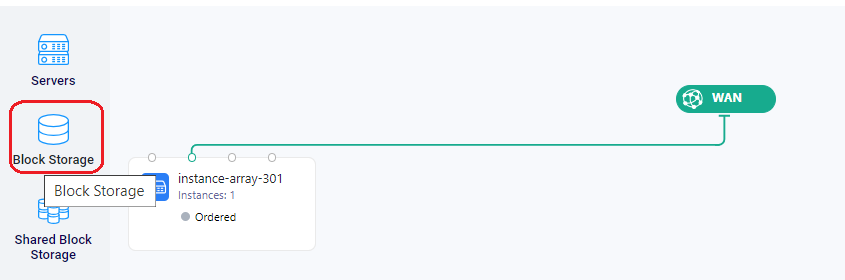
This will add a block storage to the diagram
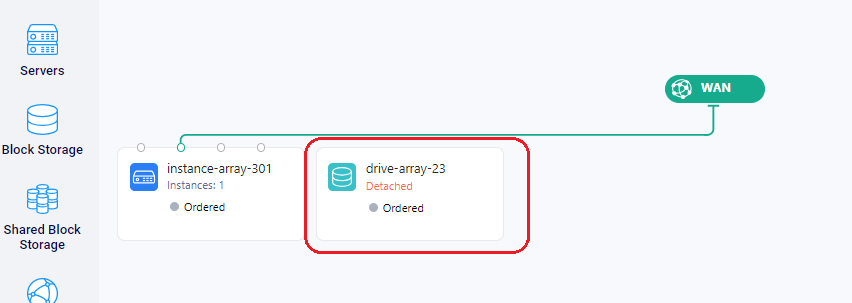
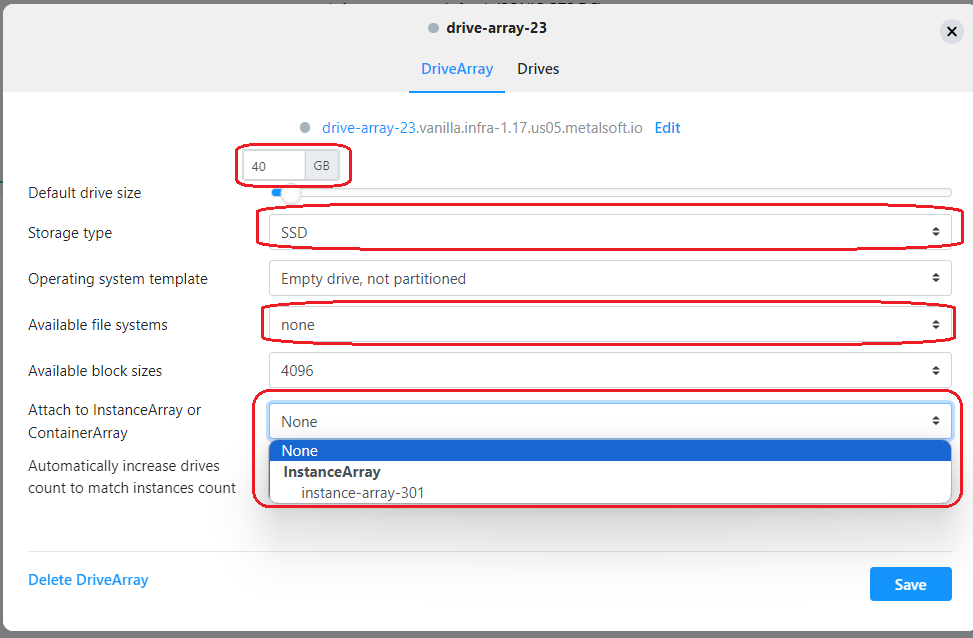
Click on the drive-array and select the size, the Storage Type, the file system and attach it to the InstanceArray and click “Save”
Click “Deploy” down the bottom right corner
In the Infrastructure Deploy window, click “Deploy”
During the deploy, go to the Admin UI and follow the above instructions to view the AFC graph in the Job queue as detailed in the “Test deployment of instance array” chapter
If available, test deployment of shared drive
In the Admin UI, click on your initials at the top right and select “Infrastructure Editor”
Click on either “Servers” or “Create your first Instance Array”
In the Create New InstanceArray window, select the server type and a template to use and click on “Create”
Click on “Shared Block Storage” on the left
This will add a shared drive to the diagram
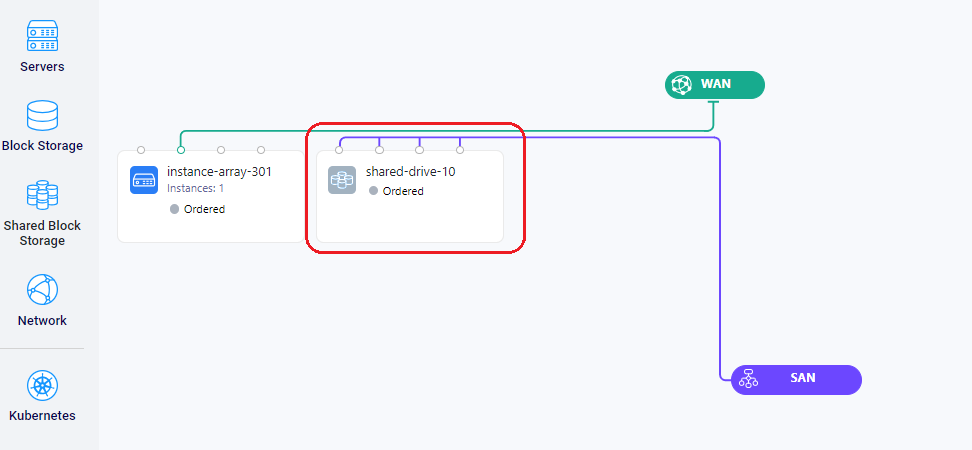
Click on the shared drive and select the size, then click “InstanceArrays”
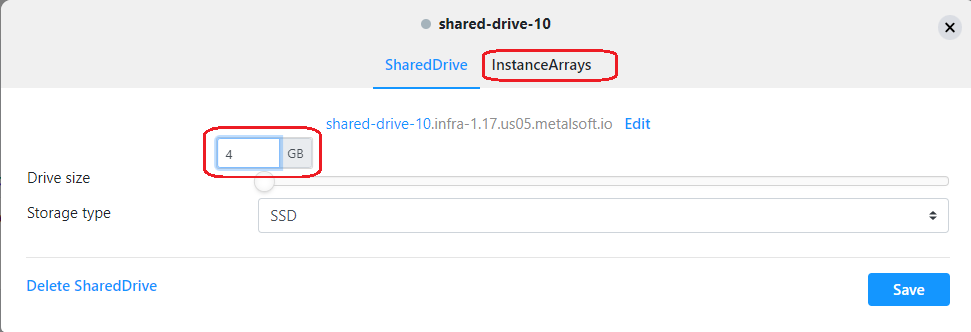
Press the radio button next to the InstanceArray and click “Save”
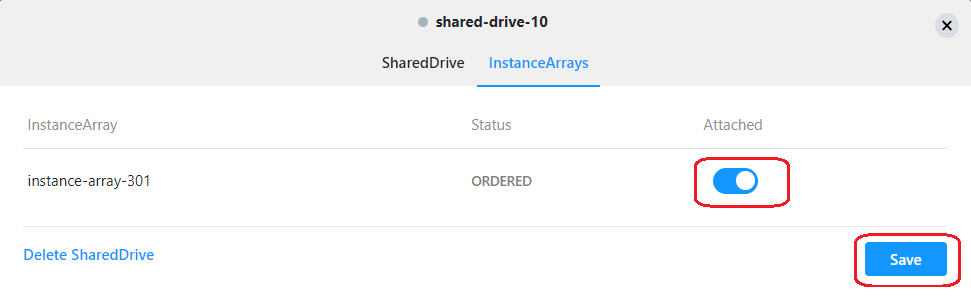
Click “Deploy” down the bottom right corner
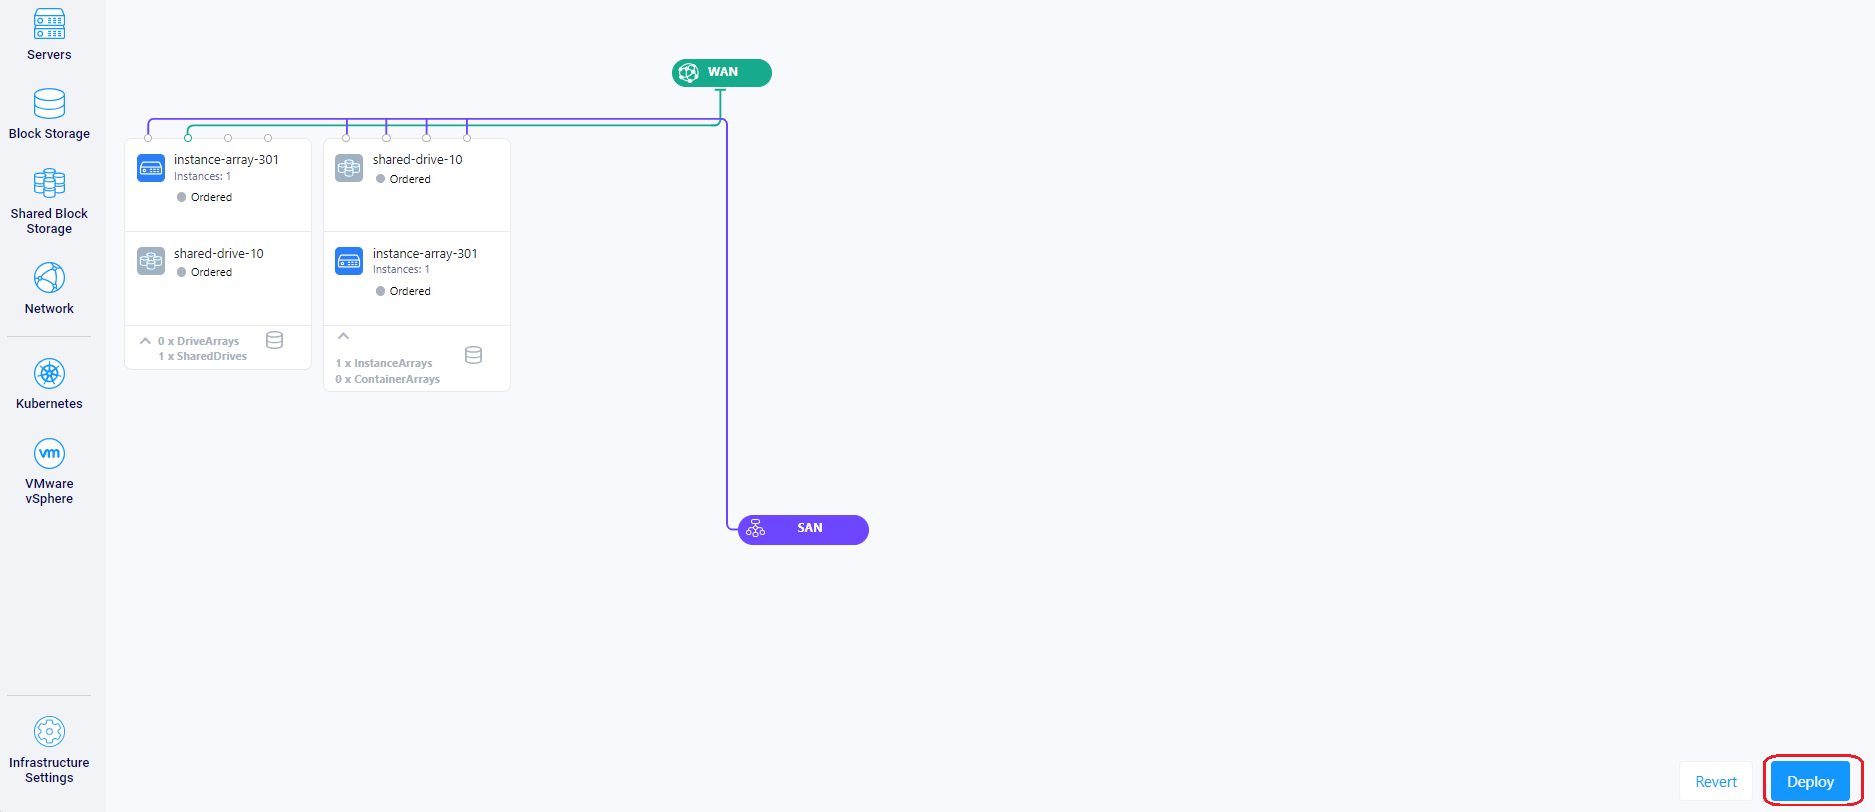
In the Infrastructure Deploy window, click “Deploy”
During the deploy, go to the Admin UI and follow the above instructions to view the AFC graph in the Job queue as detailed in the “Test deployment of instance array” chapter
Check if a user can be added as a delegate to a deployed Infrastructure
In the Admin UI, click on your initials at the top right and select “Infrastructure Editor”
Click on the Infrastructure Settings down the bottom left of the screen

Click on “Sharing” add the e-mail address of an existing user, click “Grant Access” (you will see the users e-mail address show up below the box) and click “Save”

The user should receive an e-mail. They should enter the Infrastructure Editor and click on the “Infrastructure” drop down at the top and select the Infrastructure you have shared

Check VNC console works from Instance
In the Admin UI, click on your initials at the top right and select “Infrastructure Editor”
Click on either “Servers” or “Create your first Instance Array”
In the Create New InstanceArray window, select the server type and a template to use and click on “Create”
Click “Deploy” down the bottom right corner
In the Infrastructure Deploy window, click “Deploy”
Once the Infrastructure has deployed, click on the InstanceArray

Click on Remote Console
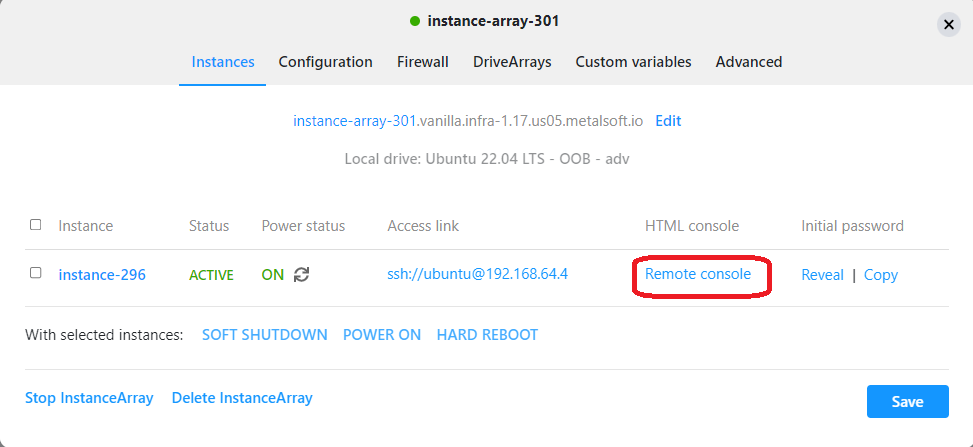
This will bring up a new tab with the remote console