

Ansible tasks
MetalSoft has the ability to execute Ansible playbooks via the site controller at certain moments in time. MetalSoft does this via the Ansible Task Type (taskType: ExtensionTaskAnsible) attached to a workflow or other extension kinds.
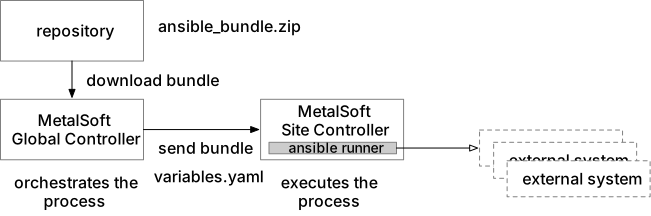
The user provides the Ansible playbook and associated roles as an Ansible bundle (a zip archive) and marks which callback points the playbook should be attached to. At runtime, MetalSoft generates the inventory and the variables describing the execution context (such as details about the server being registered) and passes them to the playbook.
Execution process
Section titled “Execution process”- Depending on the
stage, a Job Graph is updated with several tasks that prepare and execute the Ansible playbook on the site controller. - The global controller downloads the Ansible bundle specified in the extension’s
assets[*].urland sends it to the site controller. - The site controller runs
ansible-runnerin an ephemeral container (the execution environment), using the standard ansible-runner layout under/opt/metalsoft/ansible-jobs/<task_uuid>/:
<task_uuid>/├── project/ # the bundle, unzipped│ └── job.yml # the requested playbook, renamed (job.yml is a reserved name)├── inventory/│ └── inventory.yaml # generated inventory├── env/│ └── extravars # generated variables (one merged JSON)└── artifacts/ # runner outputThe generated variables are passed as extra-vars — reference them directly in the playbook (e.g. {{ server.model }}). See Structuring Ansible bundles for the complete runtime contract.
Developing the Ansible playbook
Section titled “Developing the Ansible playbook”The Ansible files that need to be created depend on the task at hand. Develop and test the playbook locally before registering the extension — see Testing the bundle offline for a fixture-based approach using a sample of the generated variables.
Creating and registering a simple Ansible extension
Section titled “Creating and registering a simple Ansible extension”The following steps show the process of creating a simple Ansible playbook that prints the model and the serial number of a server being registered:
- Create a file called
test-playbook.yaml:
---- name: Print server model and serial number of server being registered  hosts: localhost  connection: local  gather_facts: false  tasks:    - name: Print the server model      ansible.builtin.debug:        msg: "Model: {{ server.model }}"
    - name: Print the server serial number      ansible.builtin.debug:        msg: "Serial Number: {{ server.serialNumber }}"
The server variable is provided automatically as an extra-var when the task executes, based on the server being registered. See Stage payloads for what each stage provides.
- Create a zip file with the Ansible files. This file is called an “Ansible bundle”.
Note that the playbook must be in the root directory of the zip file.
zip ansible.zip test-playbook.yaml-
Upload the zip file to an HTTP repository reachable by the global controller so that the file is accessible via a URL such as:
https://repo.example.com/extensions/ansible.zip -
Create a file called
ansible-extension.json:
{ "kind": "ExtensionDefinition", "schemaVersion": "1.1", "name": "Server registration hook", "label": "server_registration_hook", "extensionType": "workflow", "vendor": "MetalSoft", "extensionVersion": "1.0.0", "description": "Prints server details on registration", "icon": "none", "dependencies": { "controllerVersion": "v7.4.0" }, "inputs": [], "outputs": [], "assets": [ { "label": "test_bundle", "name": "test ansible bundle", "assetType": "AnsibleBundle", "url": "https://repo.example.com/extensions/ansible.zip" } ], "onAssetChange": [ { "stage": "serverRegistered", "tasks": [ { "label": "print-server-details", "taskType": "ExtensionTaskAnsible", "options": { "asset": "test_bundle", "playbook": "test-playbook.yaml" } } ] } ]}- Ensure that the following are correct in this file:
- The URL of the Ansible bundle is accessible from the global controller
- The playbook name (
onAssetChange[].tasks[].options.playbook) matches the file in the root directory of the bundle - The asset label referenced by the task (
options.asset) matches the declared asset (assets[].label)
- Register and publish the extension:
metalcloud-cli extension create test-workflow workflow "test workflow" --definition-source ansible-extension.jsonmetalcloud-cli extension publish test-workflowmetalcloud-cli extension make-public test-workflow- Ensure that the Ansible Runner capability is enabled on the site controller.
You are now ready to test. Try to register a server — a series of workflow-related tasks will be inserted in the graph queue.
Callback stages supported
Section titled “Callback stages supported”See the supported workflow stages and the payload each stage provides.
Task object schema
Section titled “Task object schema”A stage can have one or more tasks of type Ansible, which are executed in order. The following is an example task definition for the ExtensionTaskAnsible task type:
{ "label": "create-or-update-dns-and-ptr-records-for-instance", "taskType": "ExtensionTaskAnsible", "options": { "asset": "power-dns-configuration", "playbook": "deploy_dns_flexible.yaml", "executionTimeout": 3600, "executionTimeoutTick": 30 }}Options
Section titled “Options”asset- The label of theAnsibleBundleasset holding the playbook.playbook- The playbook to execute (≤32 chars); must exist at the root of the asset bundle.ee- (optional) The label of anOciImageasset to run this task in a custom execution environment. If omitted, the site controller’s default execution environment is used. Every task that needs the custom image must seteeindividually.executionTimeout- Timeout for the execution, in seconds. Size it to the playbook’s worst case — if omitted, the platform default (1 hour) applies and long playbooks are reported as timed out while still running.executionTimeoutTick- How often to check/retry, in seconds.version- (optional, ≤32 chars) Informational version string.
Generated variables
Section titled “Generated variables”The stage payload (e.g. the server object for serverRegistered) is passed to the playbook as extra-vars. The payloads per stage are documented in Stage payloads. For application extensions, the generated variables also include the extension inputs and the deployment record set — see Structuring Ansible bundles.
Extension example
Section titled “Extension example”{ "kind": "ExtensionDefinition", "schemaVersion": "1.1", "name": "powerdns-automation", "label": "powerdnsautomation", "extensionType": "workflow", "vendor": "MetalSoft", "extensionVersion": "1.0.0", "description": "Manages DNS records via PowerDNS API during server lifecycle", "icon": "none", "dependencies": { "controllerVersion": "v7.4.0" }, "inputs": [], "outputs": [], "assets": [ { "label": "power-dns-configuration", "name": "power-dns-configuration", "assetType": "AnsibleBundle", "url": "https://repo.metalsoft.io/.extensions_ms/workflows/power_dns.zip" } ], "onAssetChange": [ { "stage": "serverInstanceGroupUpdateDNS", "tasks": [ { "label": "update-dns-records-for-instance-group", "taskType": "ExtensionTaskAnsible", "options": { "asset": "power-dns-configuration", "playbook": "deploy_dns_flexible.yaml" } } ] } ]}Other examples
Section titled “Other examples”Other examples are available on GitHub:
Accessing secrets
Section titled “Accessing secrets”There are multiple forms of secrets:
- Automatically generated ones such as the server’s iDRAC password or a server’s default SSH password.
- User defined ones.
MetalSoft always stores secrets in encrypted format, either in its own database or in an external vault such as Hashicorp Vault.
For example, to access the username secret from within an Ansible play, perform a GET to a local endpoint on the runner:
# Load session ID and credentials - name: Extract session ID using basename filter ansible.builtin.set_fact: session_id: "{{ playbook_dir | dirname | basename }}" - name: Dynamically retrieve password from secret store ansible.builtin.uri: url: "http://localhost/ansible/secret?name=password&folder={{ session_id }}" method: GET return_content: yes register: password_response no_log: true - name: Dynamically retrieve username from secret store ansible.builtin.uri: url: "http://localhost/ansible/secret?name=username&folder={{ session_id }}" method: GET return_content: yes register: username_response no_log: trueAvailable secrets
Section titled “Available secrets”The secrets available depend on the context as follows:
username(always)password(serverRegistered, serverDecommissioned, switchRegistered, switchDecommissioned, VM contexts)initialPassword(serverInstanceUpdate, serverInstanceUpdateDNS)publicSshKey(serverInstanceUpdate, serverInstanceUpdateDNS)certificate(VM contexts)privateKey(VM contexts)
Accessing the Ansible logs
Section titled “Accessing the Ansible logs”The logs, as well as the extracted Ansible bundle, are available inside the /opt/metalsoft/ansible-jobs/<task_uuid>/ directory in the volume attached to the ansible-runner docker container, for example:
/opt/metalsoft/ansible-jobs/5ee17203-13ba-40c9-9ed3-db12d111ee5e/Note that the execution folder is cleaned up by the platform after the task completes (or times out) — gather logs promptly, or have the playbook write debug copies of important data elsewhere.
Troubleshooting
Section titled “Troubleshooting”- Playbook not found This is often caused by a zip file that does not have the playbook in its root directory but rather inside a folder. Rezip the bundle and upload it to the repository. Also check the playbook file name in the extension definition.
- Variable not found or undefined
If a variable name does not match what is generated, inspect the
env/extravarsfile in the job directory to view the actual contents. - Other Ansible-related errors Access the logs of the Ansible execution in the job directory on the site controller.
Known issues
Section titled “Known issues”- In some cases, when there is an issue with the Ansible execution, the MetalSoft task in the deployment graph might hang for a long time before showing the error in the MetalSoft UI (approx. 1h). WORKAROUND: Use the logs to determine the issue and kill the task in the graph to be able to retry it or skip it.
- In some cases, killing the task will not kill the Ansible processes, leaving running (and retrying) Ansible processes in the runner. WORKAROUND: Delete all files in the
ansible-jobsdirectory in the ansible-runner docker container on the site controller. - Retrying the workflow task does not re-download the updated Ansible bundle. Retry the tasks above the workflow tasks to force the re-download.