

Registering switches and creating an Ethernet Fabric
In this document, you build a fabric from scratch with the following topology:
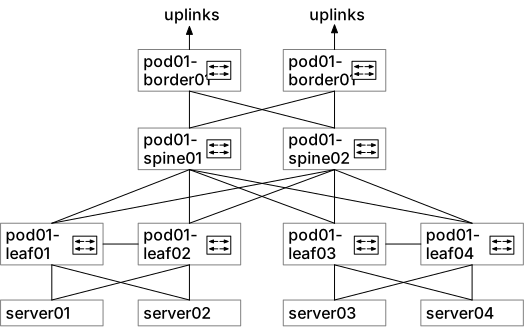
You can follow along in a GNS3, an NVIDIA AIR environment, or a physical environment. This is a screenshot from the setup used in this tutorial:
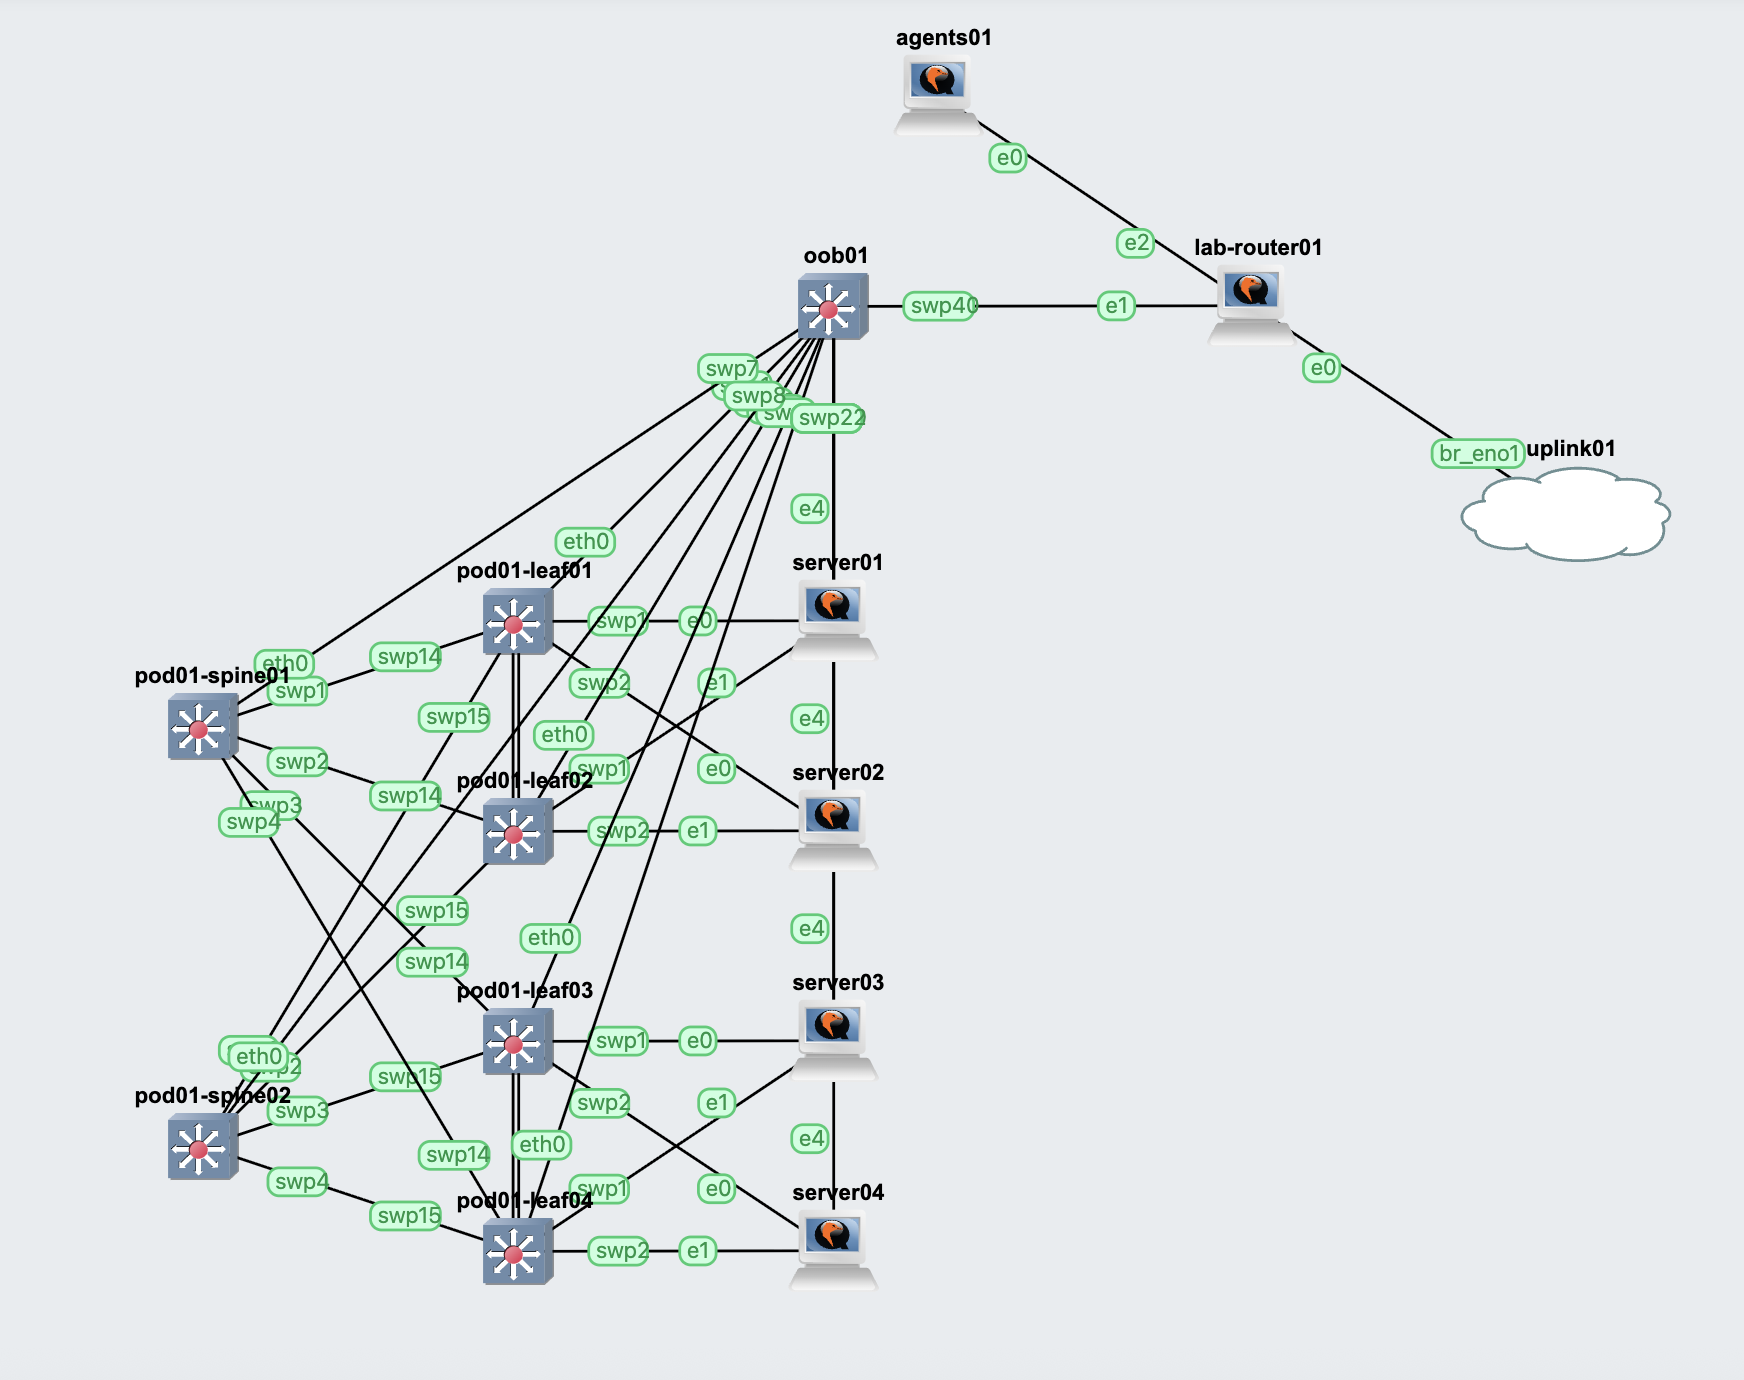
This tutorial assumes the switches are up and running and do not have anything configured on them. This exercise uses Dell Enterprise SONIC, but the tutorial applies to any other switch vendor where MetalSoft manages the switches directly. MetalSoft also manages Cisco ACI and Infiniband UFM-based switches in the same way, but the registration process is simpler for them.
Note also that you can do all of this via the CLI as well, which is sometimes faster. However, the process described here, being more visual, is easier to follow.
Preparing the ZTP configuration files
Section titled “Preparing the ZTP configuration files”Zero Touch Provisioning (ZTP) is a process that automatically bootstraps the switches. This is a vendor-dependent process, usually implemented via the ONIE and POAP protocols, both based on the DHCP protocol. In order for the process to function, a series of configurations need to exist:
- You must create a Switch Template with the necessary files (which is vendor and device specific)
- A network device default (ZTP configuration) that specifies what template to be applied on which switch based on
Manually bring a switch to its factory default setting, add any additional configurations you may want to have as a base configuration on the switch after the ZTP process. Extract a base configuration from that switch.
In the case of SONIC switches, this is a config_db.json file. For other systems this is a dump of show running configuration.
Modify this configuration file and add the following template variables to it. MetalSoft replaces them during ZTP with the generated values for the respective switch:
{ "MGMT_INTERFACE": { "eth0|{{management_interface_ip_0_address}}/{{management_interface_ip_0_prefix_size}}": { "gwaddr": "{{management_interface_ip_0_gateway}}" } }, "DEVICE_METADATA": { "localhost": { "hostname": "{{hostname}}" } }, "PORT": { "Ethernet0": { "index": "1", "lanes": "29", "alias": "Eth1/1", "admin_status": "up" }, "Ethernet1": { "index": "2", "lanes": "30", "alias": "Eth1/2", "admin_status": "up" }, "Ethernet2": { "index": "3", "lanes": "31", "alias": "Eth1/3", "admin_status": "up" }, "Ethernet3": { "index": "4", "lanes": "32", "alias": "Eth1/4", "admin_status": "up" }, "Ethernet4": { "index": "5", "lanes": "33", "alias": "Eth1/5", "admin_status": "up" }, "Ethernet5": { "index": "6", "lanes": "34", "alias": "Eth1/6", "admin_status": "up" }, "Ethernet6": { "index": "7", "lanes": "35", "alias": "Eth1/7", "admin_status": "up" }, "Ethernet7": { "index": "8", "lanes": "36", "alias": "Eth1/8", "admin_status": "up" }, "Ethernet8": { "index": "9", "lanes": "37", "alias": "Eth1/9", "admin_status": "up" }, "Ethernet9": { "index": "10", "lanes": "38", "alias": "Eth1/10", "admin_status": "up" }, "Ethernet10": { "index": "11", "lanes": "39", "alias": "Eth1/11", "admin_status": "up" }, "Ethernet11": { "index": "12", "lanes": "40", "alias": "Eth1/12", "admin_status": "up" }, "Ethernet12": { "index": "13", "lanes": "41,42,43,44", "alias": "Eth1/13", "admin_status": "up" }, "Ethernet16": { "index": "14", "lanes": "45,46,47,48", "alias": "Eth1/14", "admin_status": "up" }, "Ethernet20": { "index": "15", "lanes": "49,50,51,52", "alias": "Eth1/15", "admin_status": "up" } }}This file serves as the base of the switch on top of which tenant-level operations run. It can reference variables from the list below.
Create another file called ztp.json with the following content:
{ "ztp": { "configdb-json": { "url": { "source": "{{HTTP_SERVER_ENDPOINT}}/config_db.json", "destination": "/etc/sonic/config_db.json" }, "save-config": true } }}1. Create the leaf switch network device templates
Section titled “1. Create the leaf switch network device templates”- Go to Templates → Network device OS templates → Create network device OS template
- Give it a name such as Sonic Leaf template
- Give it a label such as sonic-leaf-template
- Select a switch role such as a leaf or spine
- Go to Sonic Leaf template → Assets
- Create the
config_db.jsonasset:- Click Add Asset
- Name:
config_db.json - Path:
/config_db.json - Usage:
generic (using template engine) - Paste the content of the config_db extracted before in the content box. You can also edit this later.
- Create the
ztp.jsonasset:- Click Add Asset
- Name:
ztp.json - Path:
/ztp.json - Usage: Switch ZTP config (using templating engine)
- Paste the content of the
ztp.jsonfile in the content box. You can also edit this later.
- Create the Firmware binary asset:
- Click Add Asset
- Name: Enterprise_SONiC_OS_4.0.2_Enterprise_Premium.bin
- Path: /Enterprise_SONiC_OS_4.0.2_Enterprise_Premium.bin
- URL: url of the .bin image on your repository
- Create the
2. Create the Network Device default entries
Section titled “2. Create the Network Device default entries”- Go to Network devices → Network device defaults → Add network device defaults
- Select a “position” such as “Leaf”
- Input a default hostname
- If required and the template files use it, input the AS number and other details here. (Note that MetalSoft will replace this process starting with version 7.2.)
- Select the template created before in the OS template field
- Repeat the above process for all leaf switches and spine switches. In the future you can use the CLI to replicate this process multiple times for multiple switches.
3. Create an Ethernet fabric for the OOB network
Section titled “3. Create an Ethernet fabric for the OOB network”This will allow the system to allocate IPs to the switches’ management interfaces.
- Go to Fabrics → Add fabric
- Name it OOB
- Click Add fabric
- Select the newly created Fabric and go to the Configuration tab
- Ensure that the Zero-Touch Provisioning Enabled checkbox is enabled
4. Create an IP range for the OOB IPs for the switches
Section titled “4. Create an IP range for the OOB IPs for the switches”- Go to IPAM → Subnets → Add subnet
- Select Out-of-band
- Fabric: Select the previously created OOB fabric
- No parent
- Input the subnet such as 10.0.100.0/24
- Select Single
- If you have other devices in the same network, you can either add them in the deny list here or later in the configuration, you can explicitly allow only specific MAC addresses from receiving IPs.
- Click Add Subnet
5. Reboot the switches in ONIE mode
Section titled “5. Reboot the switches in ONIE mode”Via the console of the switch, put one of the switches in ZTP mode (ONIE in the case of Dell Enterprise Sonic). If everything works well, you should see the switch booting and pulling the ZTP information. If the switch does not receive an IP address, try TCP dumps on the Site Controller to monitor the DHCP traffic. More often than not, the issue is with the network configuration between the switches and the site controller or with the device performing the DHCP relay function. If all goes well, put all the switches in ONIE mode and wait until they are imaged and the initial configuration is pushed. They will appear in the network devices section as they are discovered.
6. Create the In-band Fabric
Section titled “6. Create the In-band Fabric”After or during the switch registration, create another Ethernet Fabric.
- Go to Fabrics → Add fabric
- Name it “In-band”
- Select the site
- Click Add fabric
- In the configuration tab ensure that the following are checked:
- Syslog Monitoring Enabled
- Add VLAN ranges from which the system can allocate (or simply the range of VLANs that can be used by the system)
7. Add the switches to the Fabric
Section titled “7. Add the switches to the Fabric”As the switches appear in the network devices, you can add them to the In-band fabric:
- In Fabric Manager, go to Fabrics, click on the fabric you wish to add the network device to.
- Under Topology click on Add Element → Network devices
- Select the network device and add them to the fabric one by one
You are now ready to add the endpoints to the network.
Available variables
Section titled “Available variables”The following variables are available in the ZTP template files:
{{HTTP_SERVER_ENDPOINT}}- API endpoint of the site controller from which the ZTP process can pull additional files{{hostname}}- The hostname of the switch{{management_interface_ip_0_address}}- The IP of the switch management port on the OOB network{{management_interface_ip_0_gateway}}- The IP of the gateway on the OOB network{{management_interface_ip_0_mask}}- The netmask such as255.255.255.0{{management_interface_ip_0_prefix_size}}- The prefix size if CIDR notation is preferred: such as24{{asset_id}}- The ID of the asset being rendered{{tftp_server}}- The IP of the server serving the file{{http_repo_token}}- Unique ID for asset rendering{{site_controller_repo_ip}}- The IP of the repository server on the Site Controller{{loopback_ipv4}}- IPv4 address of a loopback interface [Deprecated]{{loopback_ipv6}}- IPv6 address of a loopback interface [Deprecated]{{vtep_ipv4}}- IPv4 address of the VTEP [Deprecated]{{vtep_ipv6}}- IPv6 address of the VTEP [Deprecated]{{asn}}- AS Number [Deprecated]{{mlag_system_mac}}- System MAC of the MLAG [Deprecated]{{mlag_domain_id}}- MLAG domain ID [Deprecated]
In addition to the above, you can use custom variables. Note that custom variables can override any of the above.