

Adding a new server
You can add a new managed server in multiple ways:
- Via the UI, using the Add Server button from the Servers section of the Admin UI
- Via the CLI
- Via the “Zero Touch” registration process (only managed servers)
Adding a new managed server via the Add Server button
Section titled “Adding a new managed server via the Add Server button”This process is also known as “Server Registration”.
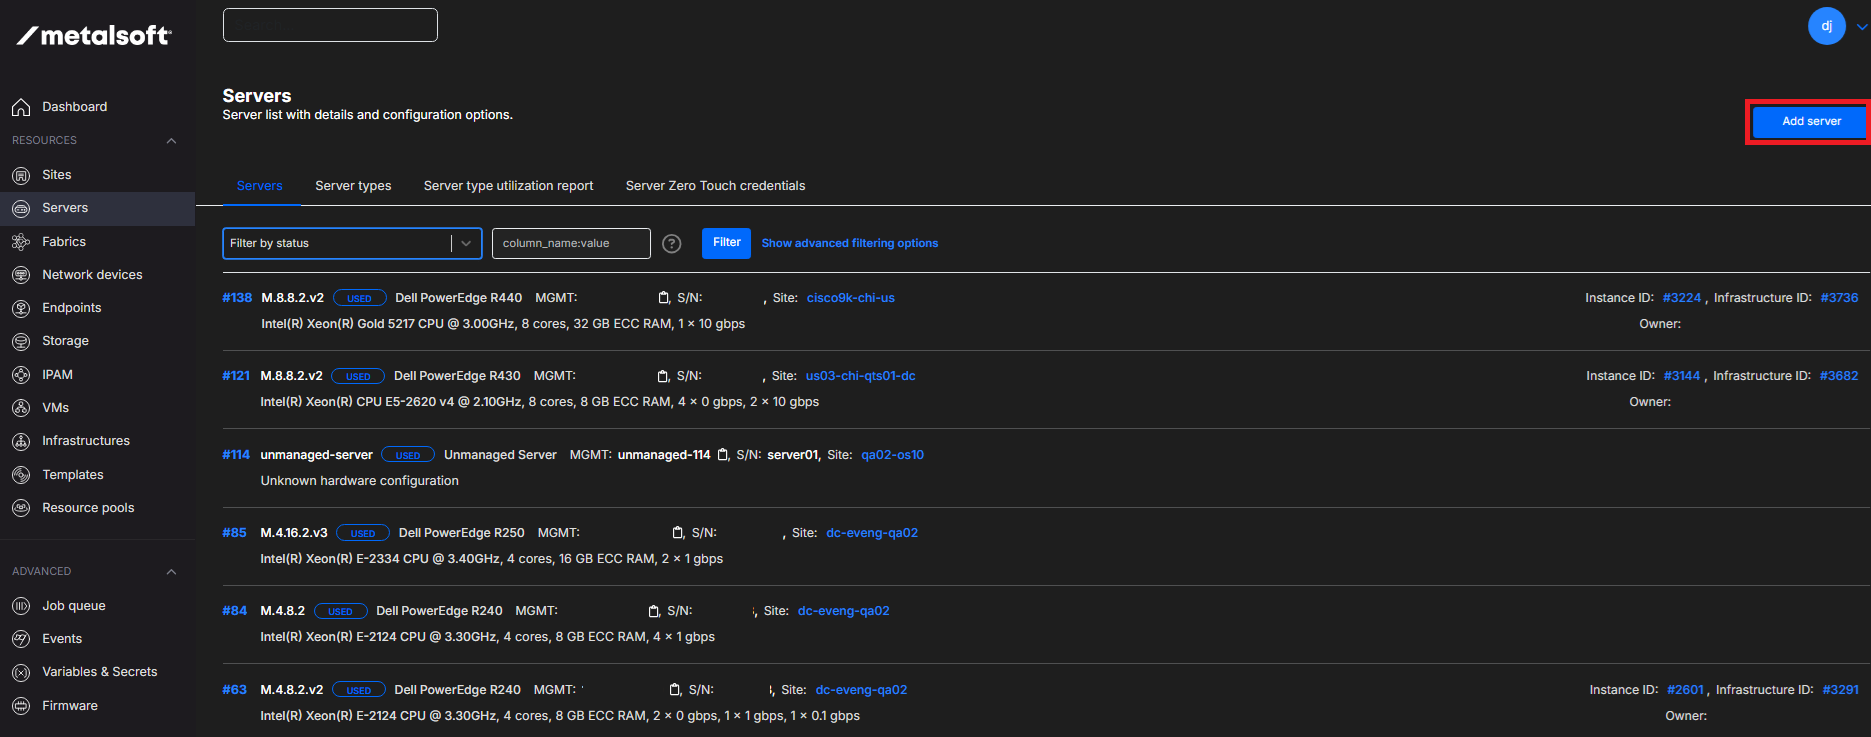
To register a new server, navigate to the Servers section and click the Add server button.
Select the vendor and input the BMC IP address and management credentials.
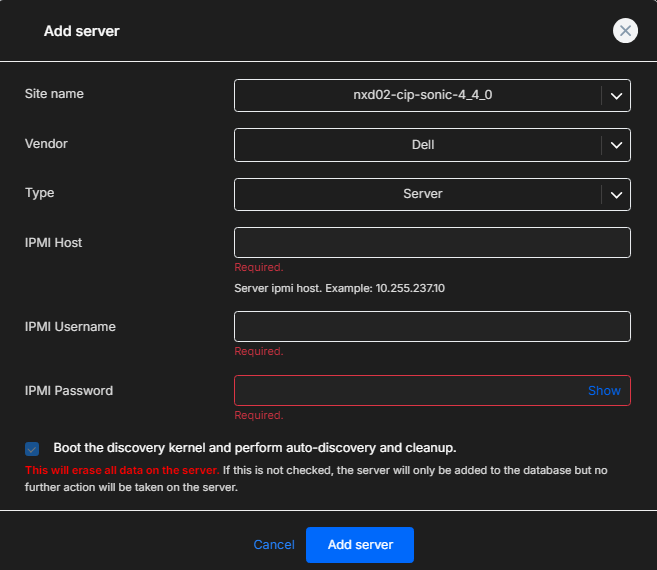
Click Add Server. The server will show up in the Registering state for up to 30 minutes.
During this process, the system connects to the BMC and extracts all of the required information, such as determining the firmware catalog, the switch connections, etc.
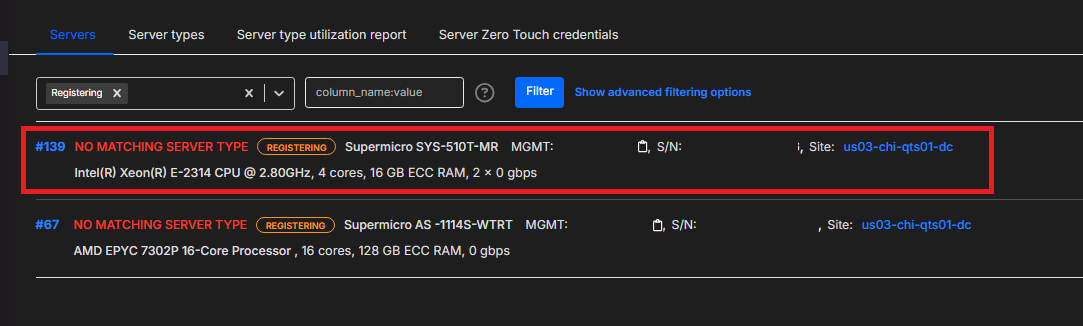
At the end of the process, the server will be in Unavailable state, meaning you can manually set it to Available to add it to the pool. This is a safety feature that prevents unauthorized devices from joining the pool. If you wish to change this behavior, in the Admin UI, navigate to Sites, Site name, Configuration, select Automatically set servers as available, and click Save configuration at the bottom of the page.
MetalSoft shuts down the server when in Available state to save energy, and powers it on automatically when allocated to an infrastructure.
MetalSoft automatically assigns a server type such as M.2.4.5 based on the server’s characteristics. If a matching server type does not exist, MetalSoft creates a new one. If there is a matching server type but only a minor difference (such as the number of links), MetalSoft creates a new version of the server type, such as M.2.4.5v2. The admin can change this server type later from the server’s Advanced tab.
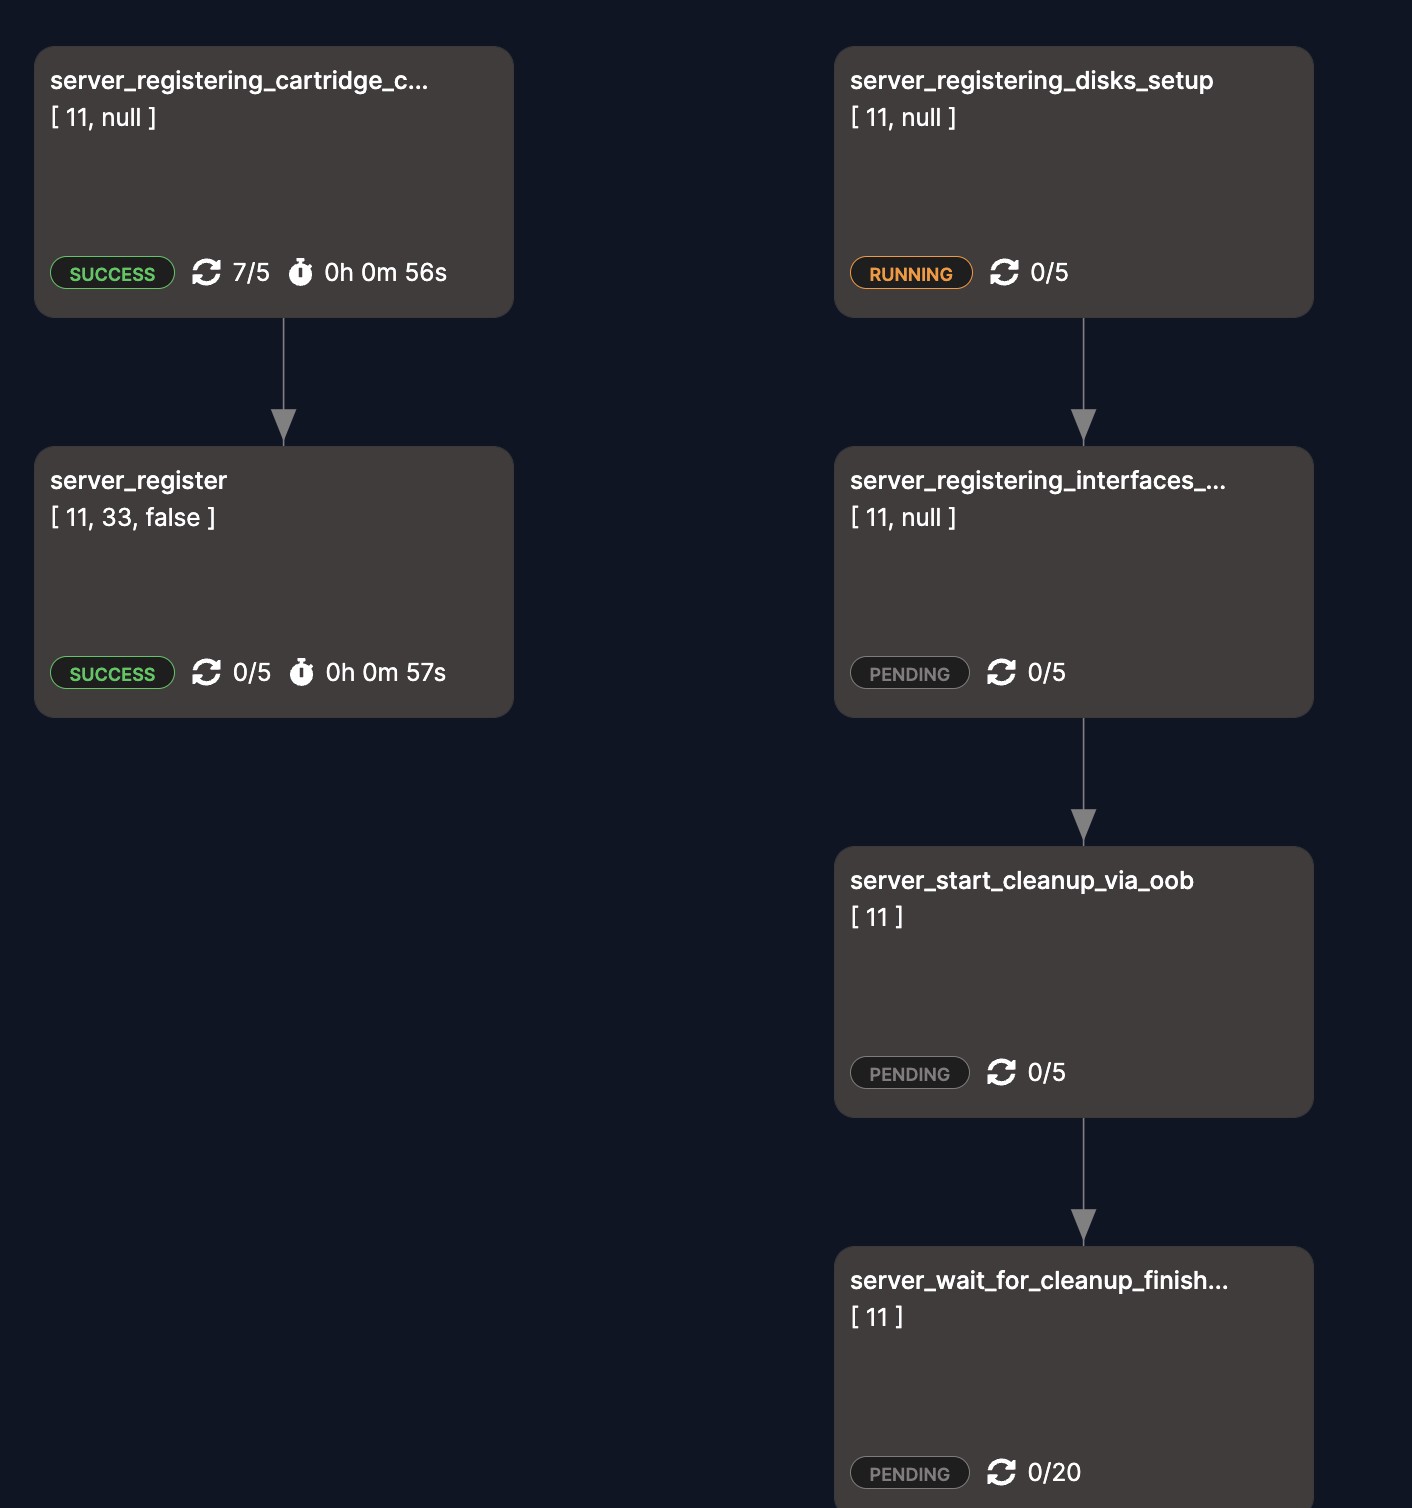
During the registration process, you can see a link to an AFC task graph on the server’s overview page. Use it to troubleshoot any registration issues.
Adding a new managed server via the CLI
Section titled “Adding a new managed server via the CLI”To start the registration process, use the following command. Ensure an OOB network is already set up. To find a list of vendors, run metalcloud-cli server register —vendor —help:
metalcloud-cli server register --model R1234 --serial-number ABCDE --site-id 2084 --vendor Dell --management-address 192.168.202.209 --username admin --password calvin
metalcloud-cli server register -config-source serverregconfig.json
Where serverregconfig.json contains the following sample information:
{ "siteId": 2084, "serialNumber": "ABCDE", "username": "admin", "managementAddress": "192.168.202.209", "vendor": "Dell", "password": "calvin", "model": "R1234"}Check the server status using the CLI:
metalcloud-cli server list┌─────┬──────┬───────┬──────────────────────────────────────┬───────────────────────┬───────────────┬────────────┬──────────────────────┬─────────────┐│ # │ SITE │ TYPE │ UUID │ S/N │ IP │ VENDOR │ MODEL │ STATUS │├─────┼──────┼───────┼──────────────────────────────────────┼───────────────────────┼───────────────┼────────────┼──────────────────────┼─────────────┤│ 139 │ 2080 │ │ 637F9200-D7B5-11EC-8000-3CECEFCEFCB0 │ S459124X3207796 │ 172.18.33.59 │ Supermicro │ SYS-510T-MR │ registering ││ 138 │ 2084 │ 10066 │ 44454c4c-3900-104a-8039-b4c04f483033 │ 49J9H03 │ 172.18.32.15 │ Dell │ PowerEdge R440 │ used ││ 136 │ 11 │ 10068 │ 70687704-945e-4566-85d2-130a11c2ad5e │ 00000 │ unmanaged-136 │ BSI │ Unmanaged Server │ available ││ 134 │ 11 │ 10068 │ f0b0620b-3e24-49f0-9a9d-ecbbab5931dd │ 00000 │ unmanaged-134 │ BSI │ Unmanaged Server │ available ││ 121 │ 2080 │ 10066 │ 44454c4c-5200-1036-804b-cac04f484c32 │ JR6KHL2 │ 172.18.33.61 │ Dell │ PowerEdge R430 │ used ││ 120 │ 1614 │ 10068 │ c633c660-b6d6-4b8c-a4b8-46a1781ee7aa │ test │ unmanaged-120 │ BSI │ Unmanaged Server │ available ││ 117 │ 1614 │ 10068 │ cdc774a3-57d5-49eb-a746-e626d0af6bb9 │ server04 │ unmanaged-117 │ BSI │ Unmanaged Server │ available ││ 116 │ 1614 │ 10068 │ 60ecbe41-f05e-4a44-b981-3a7c01fbf308 │ server03 │ unmanaged-116 │ BSI │ Unmanaged Server │ available ││ 114 │ 1614 │ 10068 │ a782a6a6-fae5-4ac0-ab8d-3916708d034b │ server01 │ unmanaged-114 │ BSI │ Unmanaged Server │ used ││ 86 │ 2080 │ 10067 │ 44454c4c-3800-1030-805a-b8c04f533532 │ 880ZS52 │ 172.18.33.62 │ Dell │ PowerEdge R430 │ available ││ 85 │ 11 │ 10079 │ 44454c4c-4c00-1043-8056-c7c04f4d5333 │ GLCVMS3 │ 10.255.148.39 │ Dell │ PowerEdge R250 │ used ││ 84 │ 11 │ 1537 │ 44454c4c-4800-1053-8046-b9c04f514633 │ 9HSFQF3 │ 10.255.148.41 │ Dell │ PowerEdge R240 │ used ││ 68 │ 1614 │ 10062 │ 38363739-3538-4D58-5138-323230325056 │ MXQ82202PV │ 10.255.148.46 │ HPE │ ProLiant DL360 Gen10 │ available ││ 67 │ 2080 │ │ │ S367023X9925464 │ 172.18.33.60 │ Supermicro │ AS -1114S-WTRT │ registering ││ 63 │ 11 │ 7736 │ 44454c4c-5a00-1047-8046-b7c04f314433 │ 7ZGF1D3 │ 10.255.148.40 │ Dell │ PowerEdge R240 │ used ││ 53 │ 558 │ 29 │ 68a73015-2aa3-4761-abed-d98bf1b8ce1c │ dummy_serial_server01 │ unmanaged-53 │ BSI │ Unmanaged Server │ available ││ 52 │ 558 │ 29 │ f00dc4c5-8c6d-4cbe-87dd-92f9ee0893ce │ dummy_serial_server04 │ unmanaged-52 │ BSI │ Unmanaged Server │ available ││ 51 │ 558 │ 29 │ 0ccc1af5-156e-40ae-8e08-c6394e25055a │ dummy_serial_server03 │ unmanaged-51 │ BSI │ Unmanaged Server │ available ││ 49 │ 558 │ 29 │ 154fb4ee-52d2-4369-a4ff-0f61a68b8c5e │ dummy_serial_server02 │ unmanaged-49 │ BSI │ Unmanaged Server │ used │└─────┴──────┴───────┴──────────────────────────────────────┴───────────────────────┴───────────────┴────────────┴──────────────────────┴─────────────┘Adding a new server via Zero Touch
Section titled “Adding a new server via Zero Touch”Consult Registering servers using ZTP for more details on this process.
Default RAID configuration
Section titled “Default RAID configuration”MetalSoft automatically creates a RAID array on supported systems when you register servers, based on the default cleanup profile.
Consult the HCL for details on which servers MetalSoft supports and under which conditions. This feature might require additional licenses.
The default RAID configuration profile describes the following scenarios which depend on the size and number of drives.
For each group of identically sized drives (added to the same RAID controller) for the following count of identical drives:
- 1 device -> RAID 0
- 2 devices -> RAID 1
- even number of devices -> RAID 10
- odd number of devices -> RAID 5
Note that, if enabled, end-users can also specify a Custom RAID configuration that will override this RAID configuration. To allow a user to configure a RAID profile, enable the “Allow custom RAID configuration” user limit from Users & Permissions > User > Limits. Dell BOSS controllers only support a single drive in RAID 0, or 2 drives in RAID 1. Some BOSS controllers support the drives in non-RAID configuration. Check the Dell website for more information.
Server-only operation
Section titled “Server-only operation”MetalSoft can register and deploy servers without having access to the TOR switches. However, you must complete some extra manual steps if you need IP allocation and network configuration inside the operating system:
- Create a new Ethernet fabric. This fabric will not include any switch devices but will still have logical networks, IPs, etc.
- On the Fabric’s Configuration page select “Enable server-only operation”.
- On all the servers, after registration, from the server’s network interfaces tab, for each network interface that is connected to an interface on the switch side, click “Manual fabric and redundancy group mapping”. If the switches have link aggregations setup select “Full” then select the Fabric created above from the dropdown. If the server’s port that is being managed is connected to a member of a link aggregation on the switch-side, input also a “redundancy group index” that is unique (0-99) for that link aggregation.
- Now, inside the Infrastructure Designer use logical networks created in the Fabric created at point 1. to specify what VLANs, IPs etc should be provisioned on the operating system. Specify a redundancy group index on the connection if a specific link aggregation group is to be used to transport the respective logical networks’ VLAN.
Managing servers via the API
Section titled “Managing servers via the API”Listing all servers
Section titled “Listing all servers”curl "https://<your-server>/api/v2/servers" \ -H "Authorization: Bearer <API_KEY>"Registering a new server
Section titled “Registering a new server”curl -X POST "https://<your-server>/api/v2/servers" \ -H "Content-Type: application/json" \ -H "Authorization: Bearer <API_KEY>" \ -d '{ "siteId": 1, "vendor": "Dell", "model": "PowerEdge R750", "serialNumber": "ABC1234", "managementAddress": "192.168.1.100", "managementUsername": "admin", "managementPassword": "password" }'Getting server details
Section titled “Getting server details”curl "https://<your-server>/api/v2/servers/{serverId}" \ -H "Authorization: Bearer <API_KEY>"Changing server status
Section titled “Changing server status”curl -X POST "https://<your-server>/api/v2/servers/{serverId}/actions/set-status" \ -H "Content-Type: application/json" \ -H "Authorization: Bearer <API_KEY>" \ -d '{ "status": "available" }'Re-registering a server
Section titled “Re-registering a server”curl -X POST "https://<your-server>/api/v2/servers/{serverId}/actions/re-register" \ -H "Authorization: Bearer <API_KEY>"Decommissioning a server
Section titled “Decommissioning a server”curl -X POST "https://<your-server>/api/v2/servers/{serverId}/actions/decommission" \ -H "Authorization: Bearer <API_KEY>"Troubleshooting
Section titled “Troubleshooting”Check the Server Registration Troubleshooting for more details.