

Getting started
MetalSoft is very easy to operate but it does have some unique concepts. This short introductory tutorial will walk you through deploying a server and retrieving access credentials while also explaining various MetalSoft concepts.
This guide assumes that MetalSoft has been deployed and that servers are now registered and available.
-
Log in to the infrastructure designer
You are now looking at a blank canvas on which you can create your infrastructure. MetalSoft has created a default infrastructure in the first site. Infrastructures group resources connected with a project running in the same site. Users can have any number of infrastructures. To change the site where the infrastructure will be deployed, create a new infrastructure.
-
Create an instance array
MetalSoft groups managed servers (called Instances) into InstanceArrays.
Create an InstanceArray with a single instance: click
Add Elementand clickServer.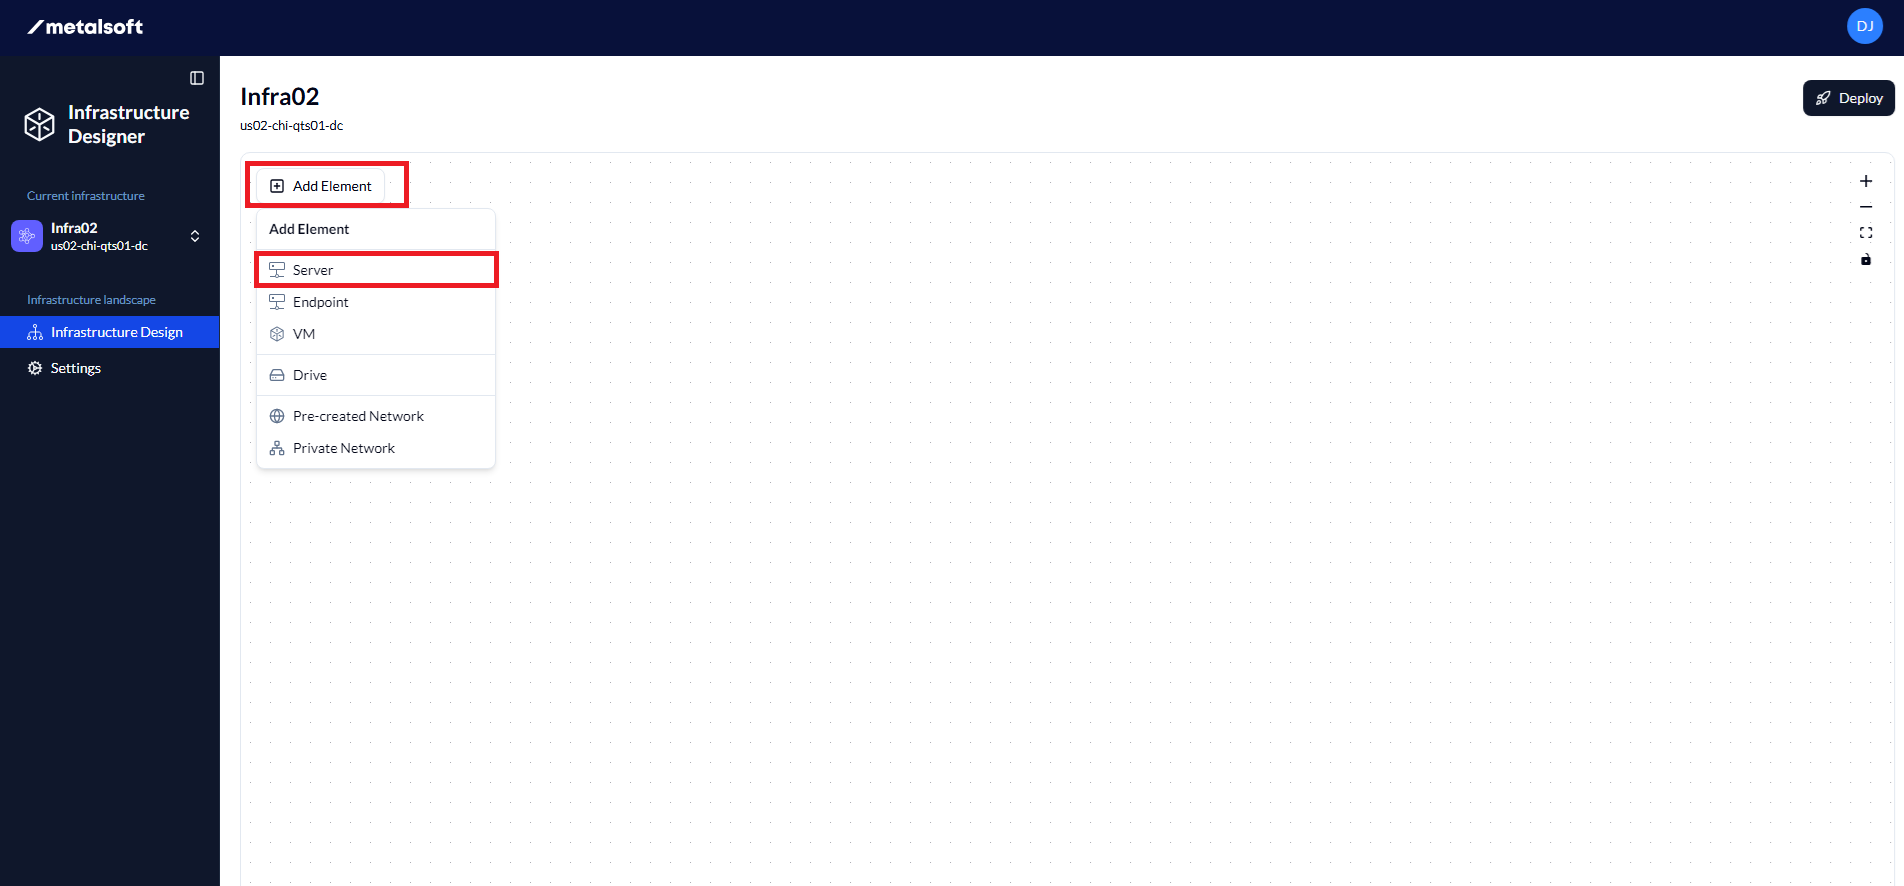
-
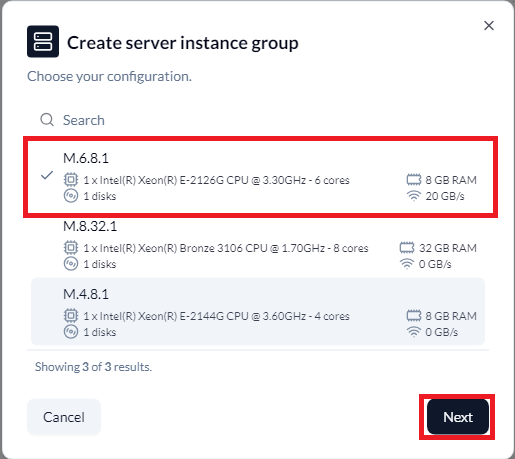
Select a server configuration
Select your type and click Next.
Enter a name and label, click Operating System and select
install on local drives, select the Operating System, and clickCreate.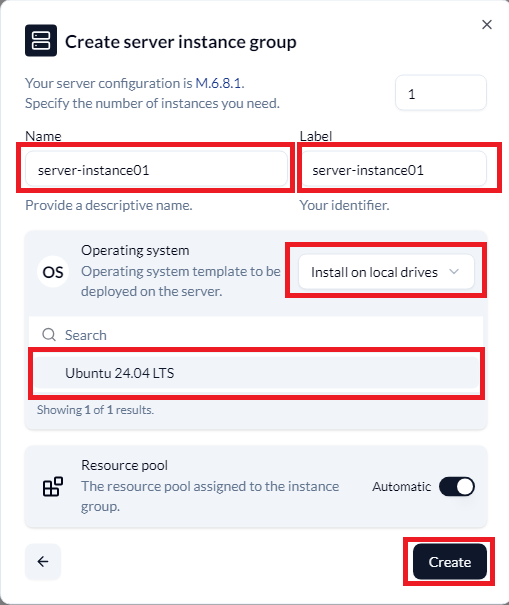
-
Add Network
Click
Add Elementand click eitherPre-created NetworkorPrivate Network.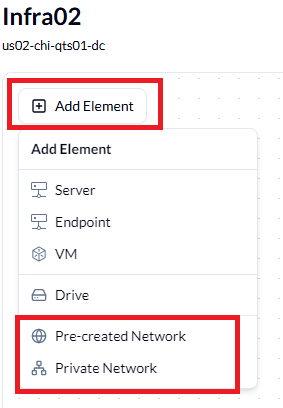
If a Private Network, add a name and label and select the network profile. If a Pre-created Network, MetalSoft adds it to the canvas. Drag the network connection from the Server Group to the Network, select the network options required, and click
Connect.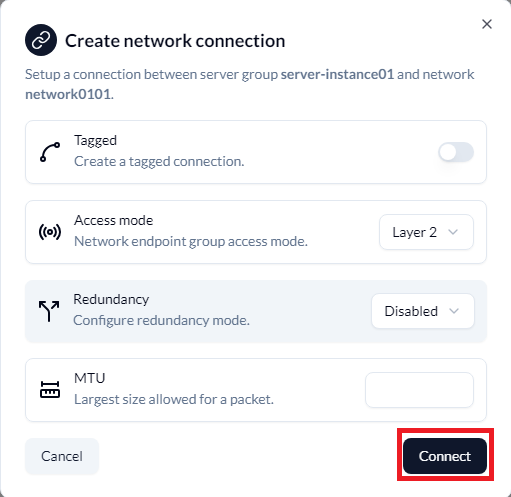
-
Configure Access Control List
To configure the access control list, click the Server Group, click
Security, and click the network.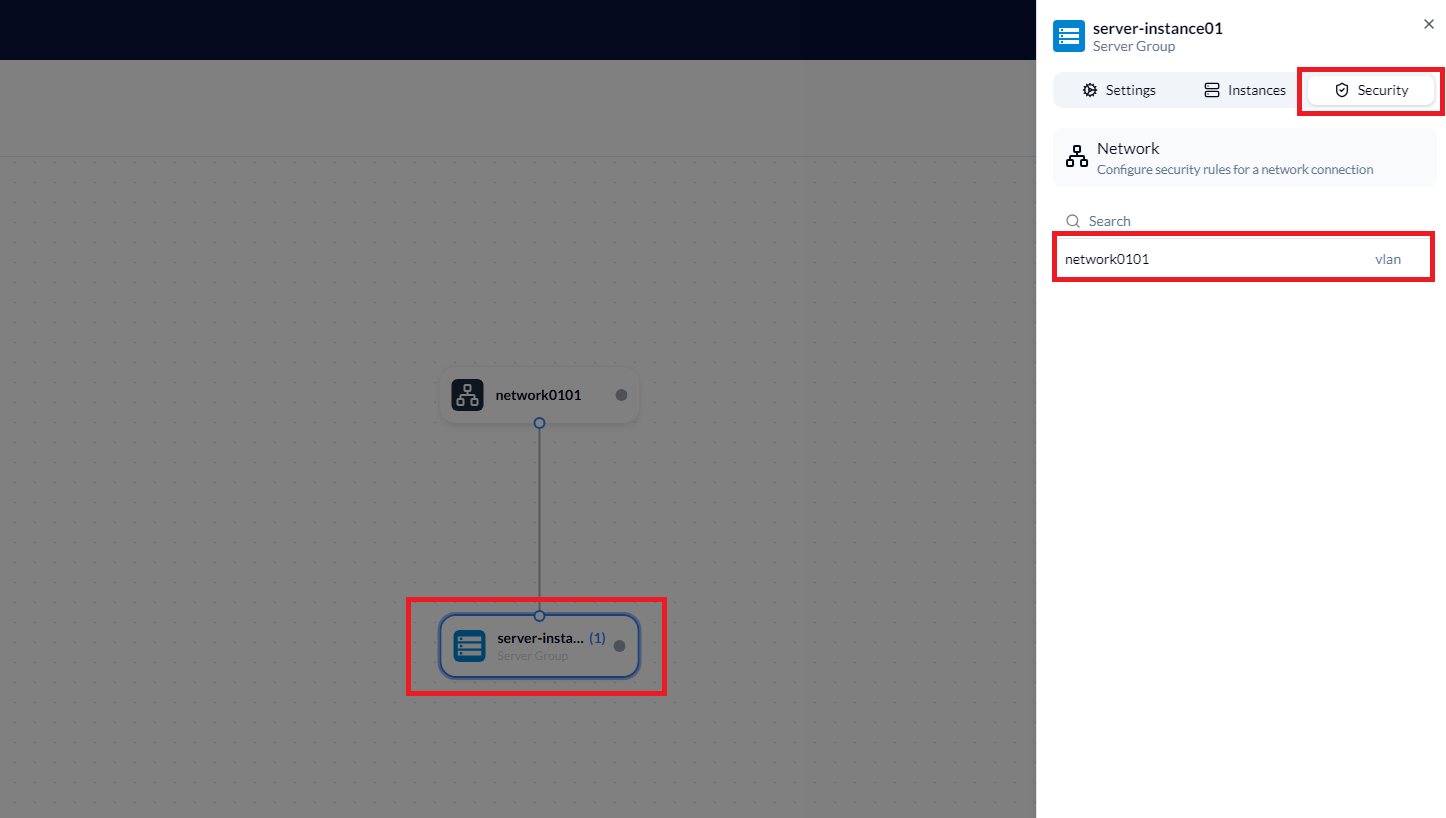
On the next page, click
+at the bottom, configure the security rule, click Create, and click the x in the top right once complete.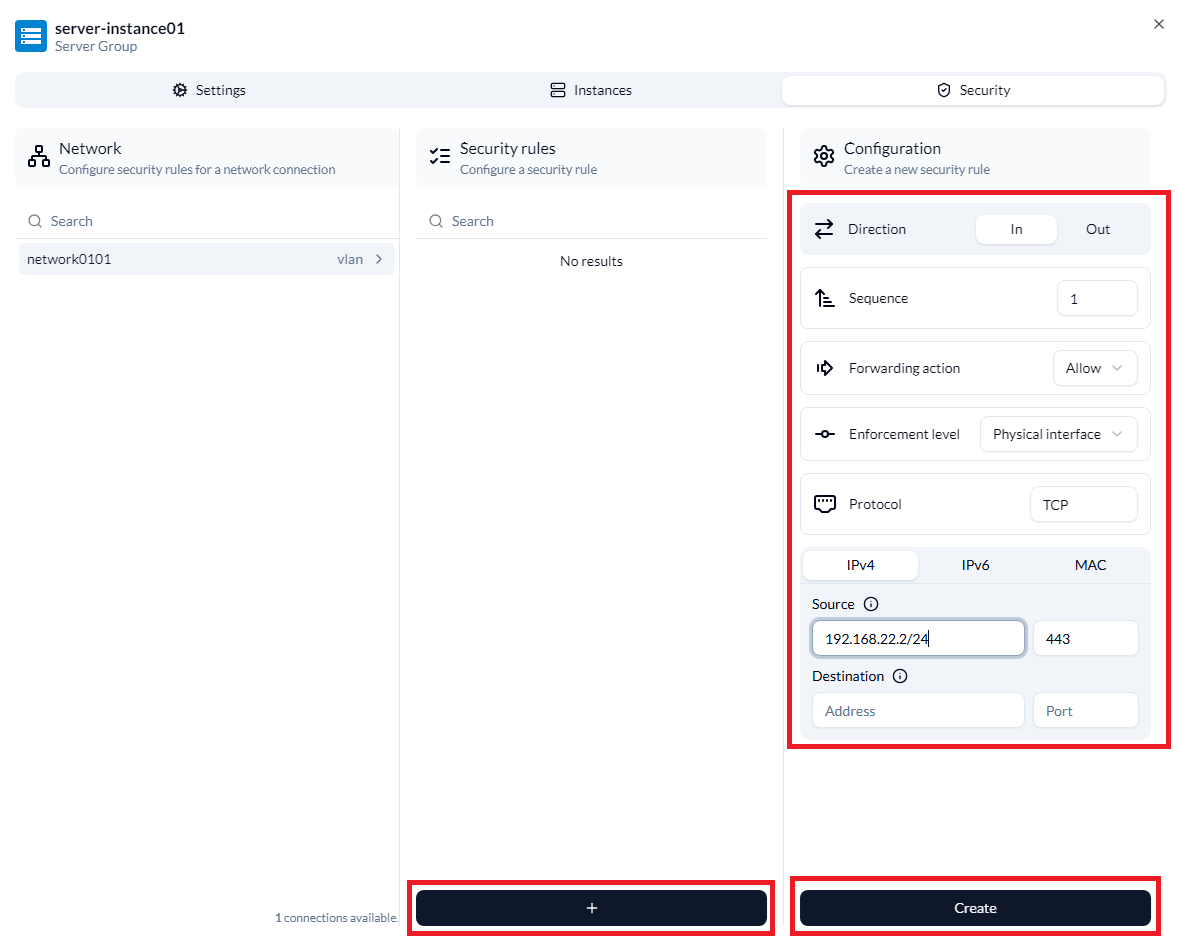
-
Deploy the infrastructure
MetalSoft does not deploy operations in the Metal Cloud immediately; in fact, you can revert them until the infrastructure is “Deployed”. Click
Deployat the top right of the screen and, in the “Ready to deploy” screen, selectAllow data lossand clickDeploy.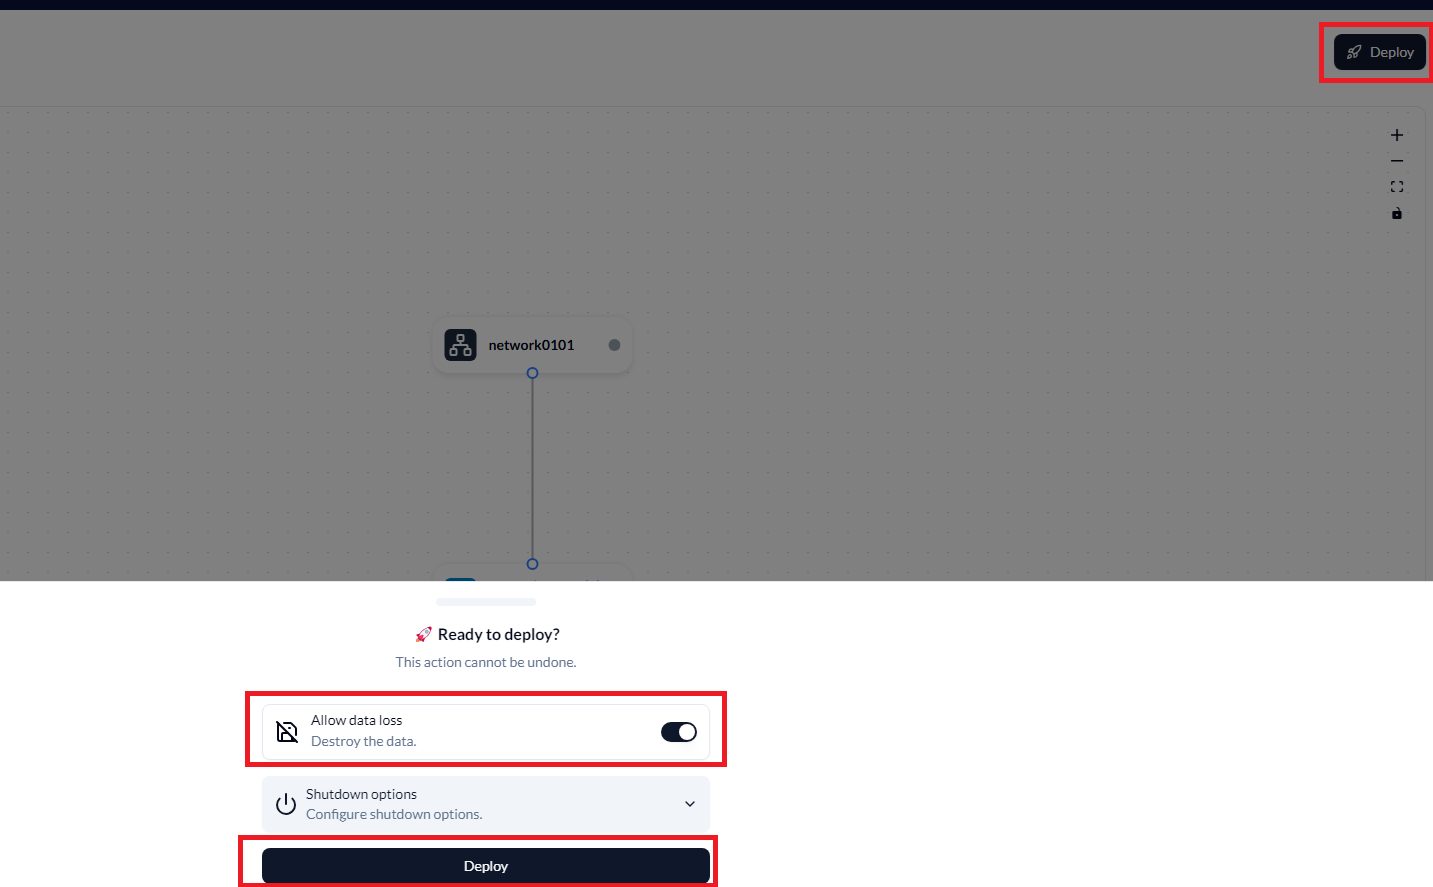
The deploy operation typically takes between 3 and 10 minutes. At the end of it, the Server Group will be in an
activestate. -
Retrieve access credentials
After the deploy, the Server Group is in “active” state. Click the Server Group, click
Instances, select the instance, and the credentials and Console are available from here: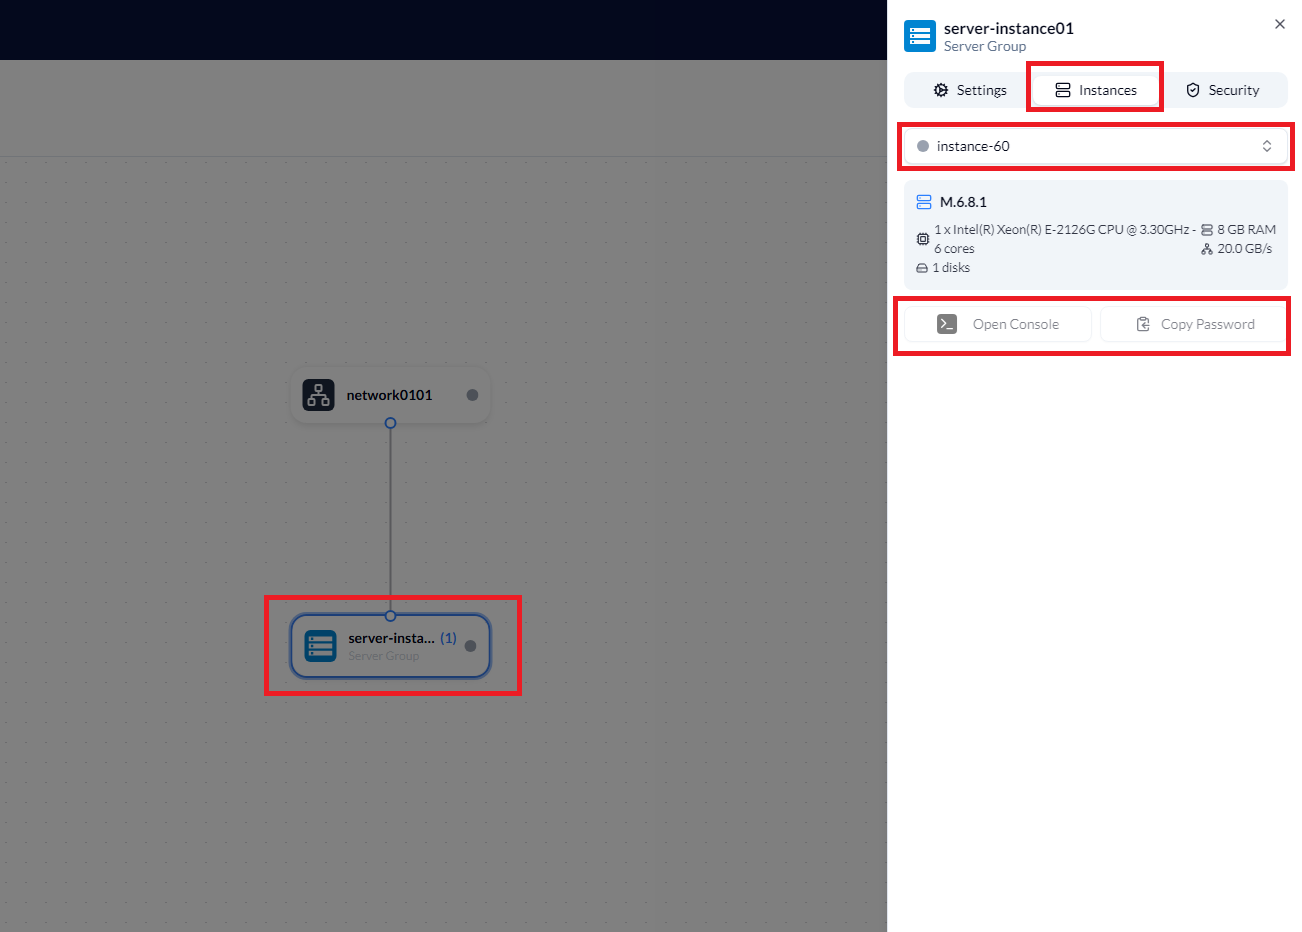 >Note: It is recommended that you register your public SSH key in the **Account settings** section so that it gets automatically added on the hosts at deploy time.
Deploying an instance array using the CLI
Section titled “Deploying an instance array using the CLI”This tutorial uses the CLI. Visit using the CLI for more details.
-
List available templates
metalcloud-cli os-template list┌───┬──────────────────┬────────────┬─────────────┬────────┬────────────┬─────────────────────┬─────────────────────┐│ # │ NAME │ LABEL │ DEVICE TYPE │ STATUS │ VISIBILITY │ CREATED │ UPDATED │├───┼──────────────────┼────────────┼─────────────┼────────┼────────────┼─────────────────────┼─────────────────────┤│ 2 │ Ubuntu 24.04 LTS │ no-network │ server │ used │ private │ 30 Apr 25 13:19 BST │ 15 Jul 25 04:46 BST │└───┴──────────────────┴────────────┴─────────────┴────────┴────────────┴─────────────────────┴─────────────────────┘ -
List available servers
metalcloud-cli server-type list┌───┬───────────────────┬───────┬───────┬─────────┬────────────────────────────────────────────────┬────────┬───────┬────────┬───────┐│ # │ NAME │ LABEL │ CPU # │ CPU MHZ │ CPU NAMES │ RAM GB │ NIC # │ DISK # │ GPU # │├───┼───────────────────┼───────┼───────┼─────────┼────────────────────────────────────────────────┼────────┼───────┼────────┼───────┤│ 1 │ M.4.8.1 │ │ 1 │ 4000 │ [Intel(R) Xeon(R) E-2144G CPU @ 3.60GHz] │ 8 │ 4 │ 1 │ 0 ││ 2 │ M.8.32.1 │ │ 1 │ 4000 │ [Intel(R) Xeon(R) Bronze 3106 CPU @ 1.70GHz] │ 32 │ 2 │ 1 │ 0 ││ 3 │ M.6.8.1 │ │ 1 │ 4000 │ [Intel(R) Xeon(R) E-2126G CPU @ 3.30GHz] │ 8 │ 4 │ 1 │ 0 ││ 4 │ M.2.16.3 │ │ 1 │ 4000 │ [Intel(R) Pentium(R) Gold G5500 CPU @ 3.80GHz] │ 16 │ 4 │ 3 │ 0 ││ 5 │ generic_unmanaged │ │ 1 │ 1000 │ [] │ 1 │ 0 │ 0 │ 0 │└───┴───────────────────┴───────┴───────┴─────────┴────────────────────────────────────────────────┴────────┴───────┴────────┴───────┘ -
Provision an Instance.
To provision an instance, you need the following:
metalcloud-cli server-instance-group create infrastructure_id_or_label label server_type_id instance_count [os_template_id]The below shows the format of the command where this uses Infrastructure 35, label of test01, server type 3, 1 server, and OS template ID 2.
./metalcloud-cli instance-array create 35 test01 3 1 2┌────┬────────┬──────────┬─────────┬─────────────────────┬─────────────────────┐│ # │ LABEL │ INFRA ID │ STATUS │ CREATED │ UPDATED │├────┼────────┼──────────┼─────────┼─────────────────────┼─────────────────────┤│ 79 │ test01 │ 35 │ ordered │ 15 Jul 25 11:46 BST │ 15 Jul 25 11:46 BST │└────┴────────┴──────────┴─────────┴─────────────────────┴─────────────────────┘ -
Deploy the infrastructure
metalcloud-cli infra deploy 35┌────┬─────────┬──────────────┬─────────┬───────┬──────┬─────────────────────┬─────────────────────┬───────────────┬───────────┐│ # │ LABEL │ CONFIG LABEL │ STATUS │ OWNER │ SITE │ CREATED │ UPDATED │ DEPLOY STATUS │ DEPLOY ID │├────┼─────────┼──────────────┼─────────┼───────┼──────┼─────────────────────┼─────────────────────┼───────────────┼───────────┤│ 35 │ infra02 │ infra02 │ ordered │ 11 │ 1 │ 15 Jul 25 08:48 BST │ 15 Jul 25 11:56 BST │ ongoing │ 70 │└────┴─────────┴──────────────┴─────────┴───────┴──────┴─────────────────────┴─────────────────────┴───────────────┴───────────┘
Listing Server Instance Groups and Server Instances in an infrastructure
Section titled “Listing Server Instance Groups and Server Instances in an infrastructure”To show a list of Server Instance Groups in an infrastructure, issue this command:
metalcloud-cli server-instance-group list 35┌────┬────────────┬──────────┬────────┬─────────────────────┬─────────────────────┐│ # │ LABEL │ INFRA ID │ STATUS │ CREATED │ UPDATED │├────┼────────────┼──────────┼────────┼─────────────────────┼─────────────────────┤│ 80 │ server0101 │ 35 │ active │ 15 Jul 25 11:55 BST │ 15 Jul 25 12:16 BST │└────┴────────────┴──────────┴────────┴─────────────────────┴─────────────────────┘To show a list of Server Instances in a Server Instance Group, issue this command:
metalcloud-cli server-instance-group instances 80┌────┬─────────────┬──────────┬──────────┬────────┬─────────────────────┬─────────────────────┐│ # │ LABEL │ INFRA ID │ GROUP ID │ STATUS │ CREATED │ UPDATED │├────┼─────────────┼──────────┼──────────┼────────┼─────────────────────┼─────────────────────┤│ 62 │ instance-62 │ 35 │ 80 │ active │ 15 Jul 25 11:55 BST │ 15 Jul 25 12:16 BST │└────┴─────────────┴──────────┴──────────┴────────┴─────────────────────┴─────────────────────┘Retrieving server access credentials using the CLI
Section titled “Retrieving server access credentials using the CLI”To retrieve your SSH credentials, use the following command:
metalcloud-cli server-instance get 62 --show-credentialsChecking the power status of all the instances in this instance array using the CLI
Section titled “Checking the power status of all the instances in this instance array using the CLI”To retrieve the status of your instances, use:
metalcloud-cli instance-array get 62 --show-power-statusRebooting an instance using the CLI
Section titled “Rebooting an instance using the CLI”To perform power operations on a particular instance, use:
metalcloud-cli instance power-control --id 1023 --operation resetPossible operations are:
- on - power on
- off - power off (hard)
- reset - Reboot (hard)
- soft - Soft shutdown (ACPI via the operating system)
View deployed server as an Admin
Section titled “View deployed server as an Admin”While users operate with InstanceArrays, DriveArrays, and other logical concepts, behind the scenes physical equipment gets provisioned.
The users interact with “instances” whereas admins interact with Servers. MetalSoft creates the mapping between an instance and a server at “provisioning” time, when the user “requests” a compute resource. MetalSoft can map an instance to another server if the user needs more resources or needs a replacement.
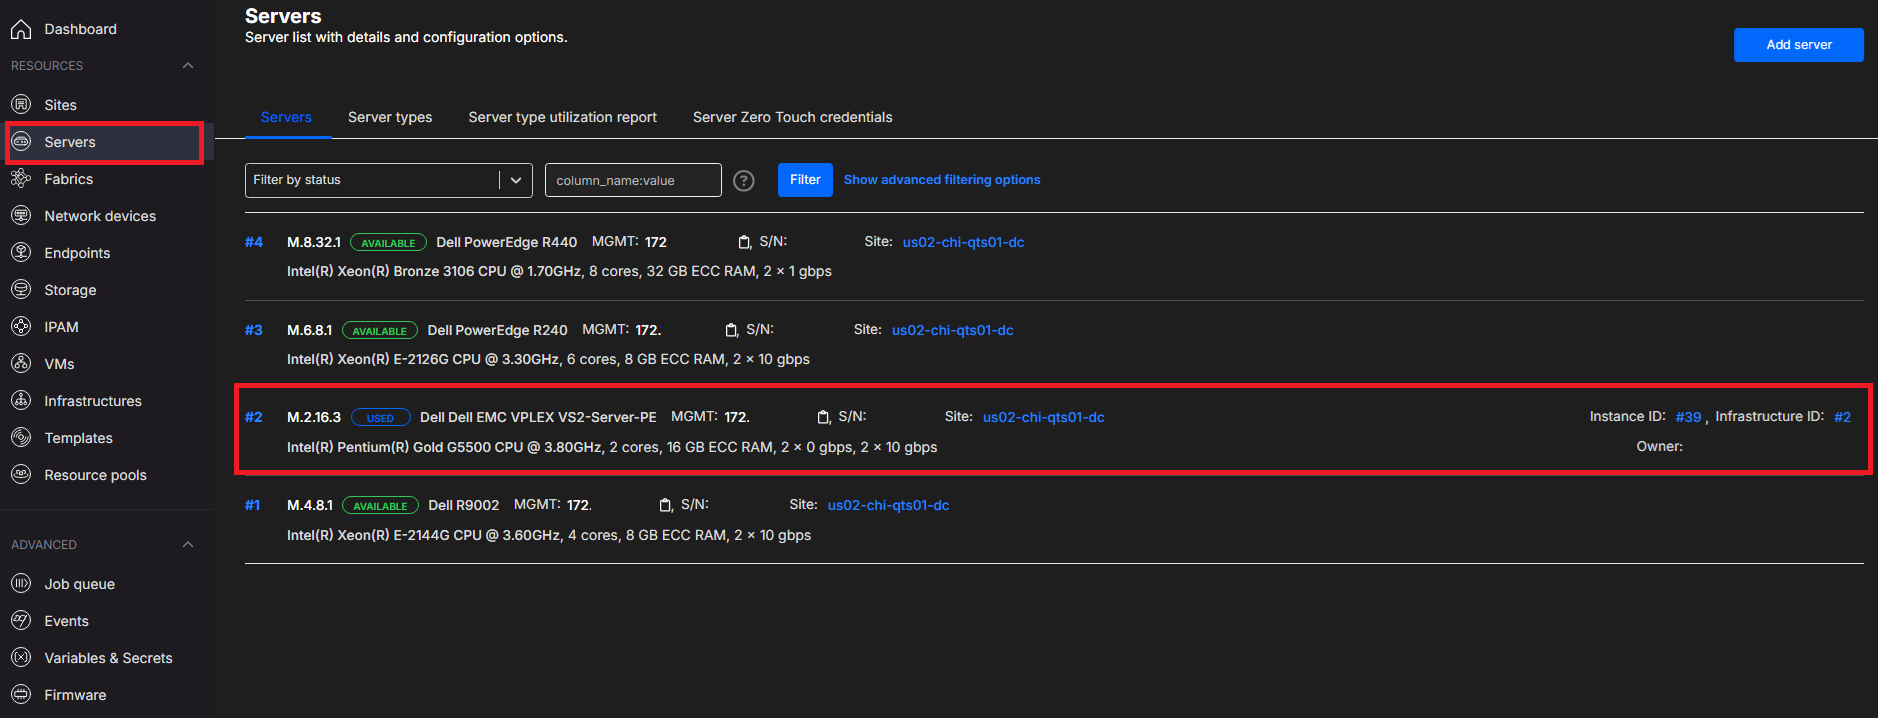
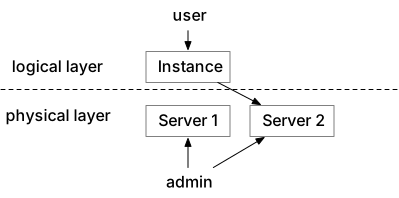 See what got provisioned:
- Log in to the Admin page.
- Go to the Servers page, locate the used server. You can use the filter bar to search for your name or email address. The server is the only result.
- Click the server’s title or id. You can now browse through the tabs. Under normal circumstances, admins should not interact with the server itself, as the process is completely automatic.
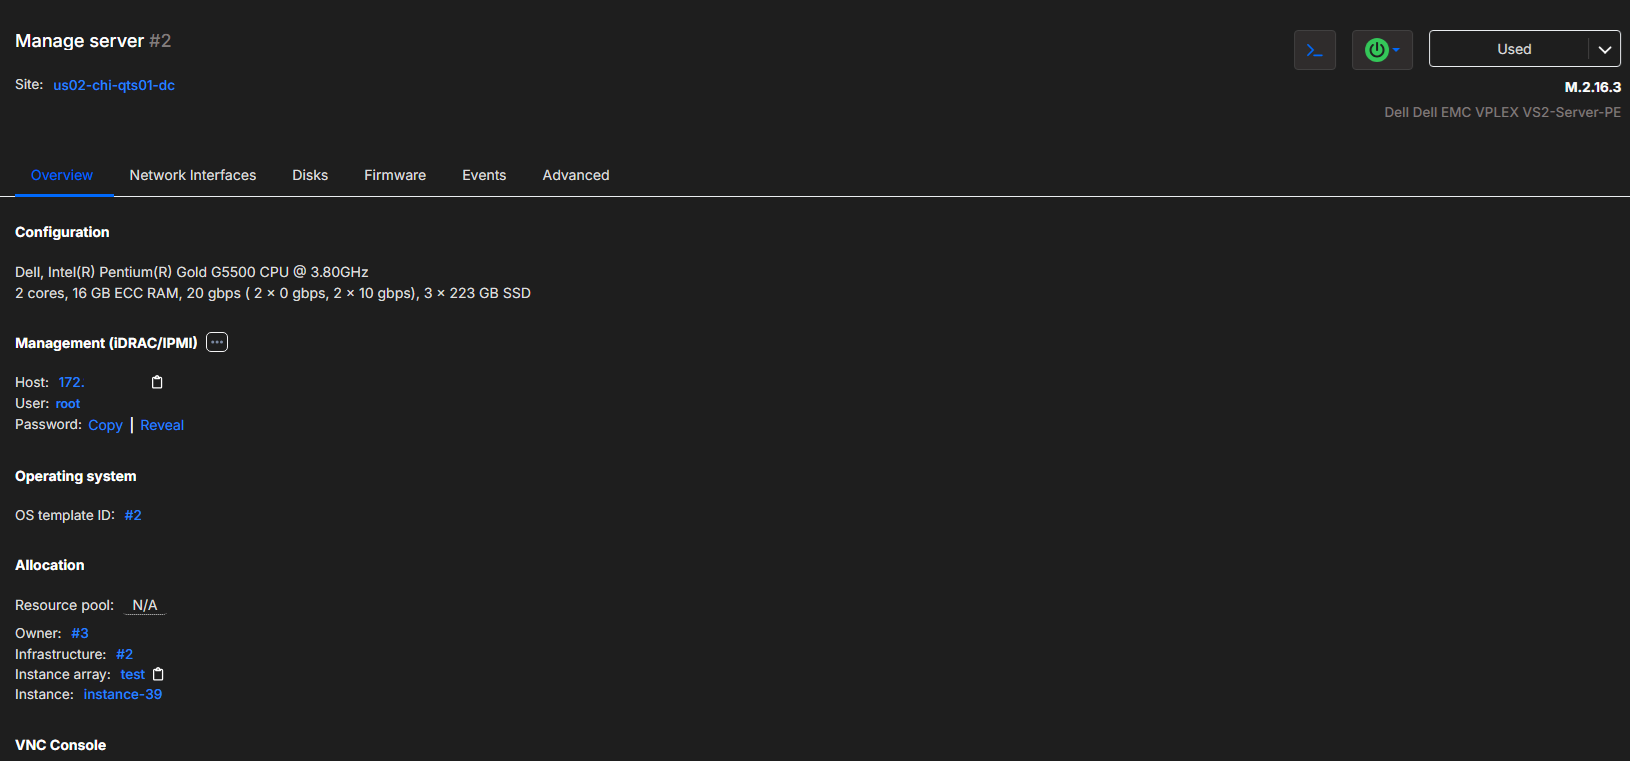
- You can use the IPMI host IP, the IPMI username, and password to log into the server’s BMC interface.
View deployed switch configuration
- Click the Server’s Network interfaces tab and check out the network connections that were created.
- Go to the
Network Devicespage. Select the switch referenced in the infrastructures tab.
Where to go from here: